
208-557-1938 • customerservice@wetstake.com • wetstake.com
Instructions
Proper setup and care of your WET Stake ensures reliable alerts all season and helps you receive your full deposit refund when returning equipment.
WET Stake
The WET Stake is a water notification device that tells you when the water reaches it.
- The WET Stake
- Tripod poles attached with the rubber connector.
- Magnetic charging cord
- Optional: Solar panel, unless you still have the old style cap
General Usage
- Charging: Make sure to fully charge your device to ensure the best performance. Charge until the orange charge light turns off.
- Placement: Place the device near the end of the row where you want to be notified that water has arrived.
- Power On: Press the power button. Ensure the notifications are set to your device if you haev not done so already.
- Monitoring: Carry on with your activities until you received the desiated call or text notification.
- Post-Usage: When water is detected, the light on top will flash 10 times every 30 seconds. This is Alert mode. Press the button to turn off the Alert mode.
- Repeat: Repeat these steps starting at Placement.
Power & Charging
Battery:
The battery lasts about 3 weeks with normal usage in power save mode. A text alert message will alert you when the battery is low. If you have a solar paenl, it will effectively keep the WET Stake charged all season.
Charging:
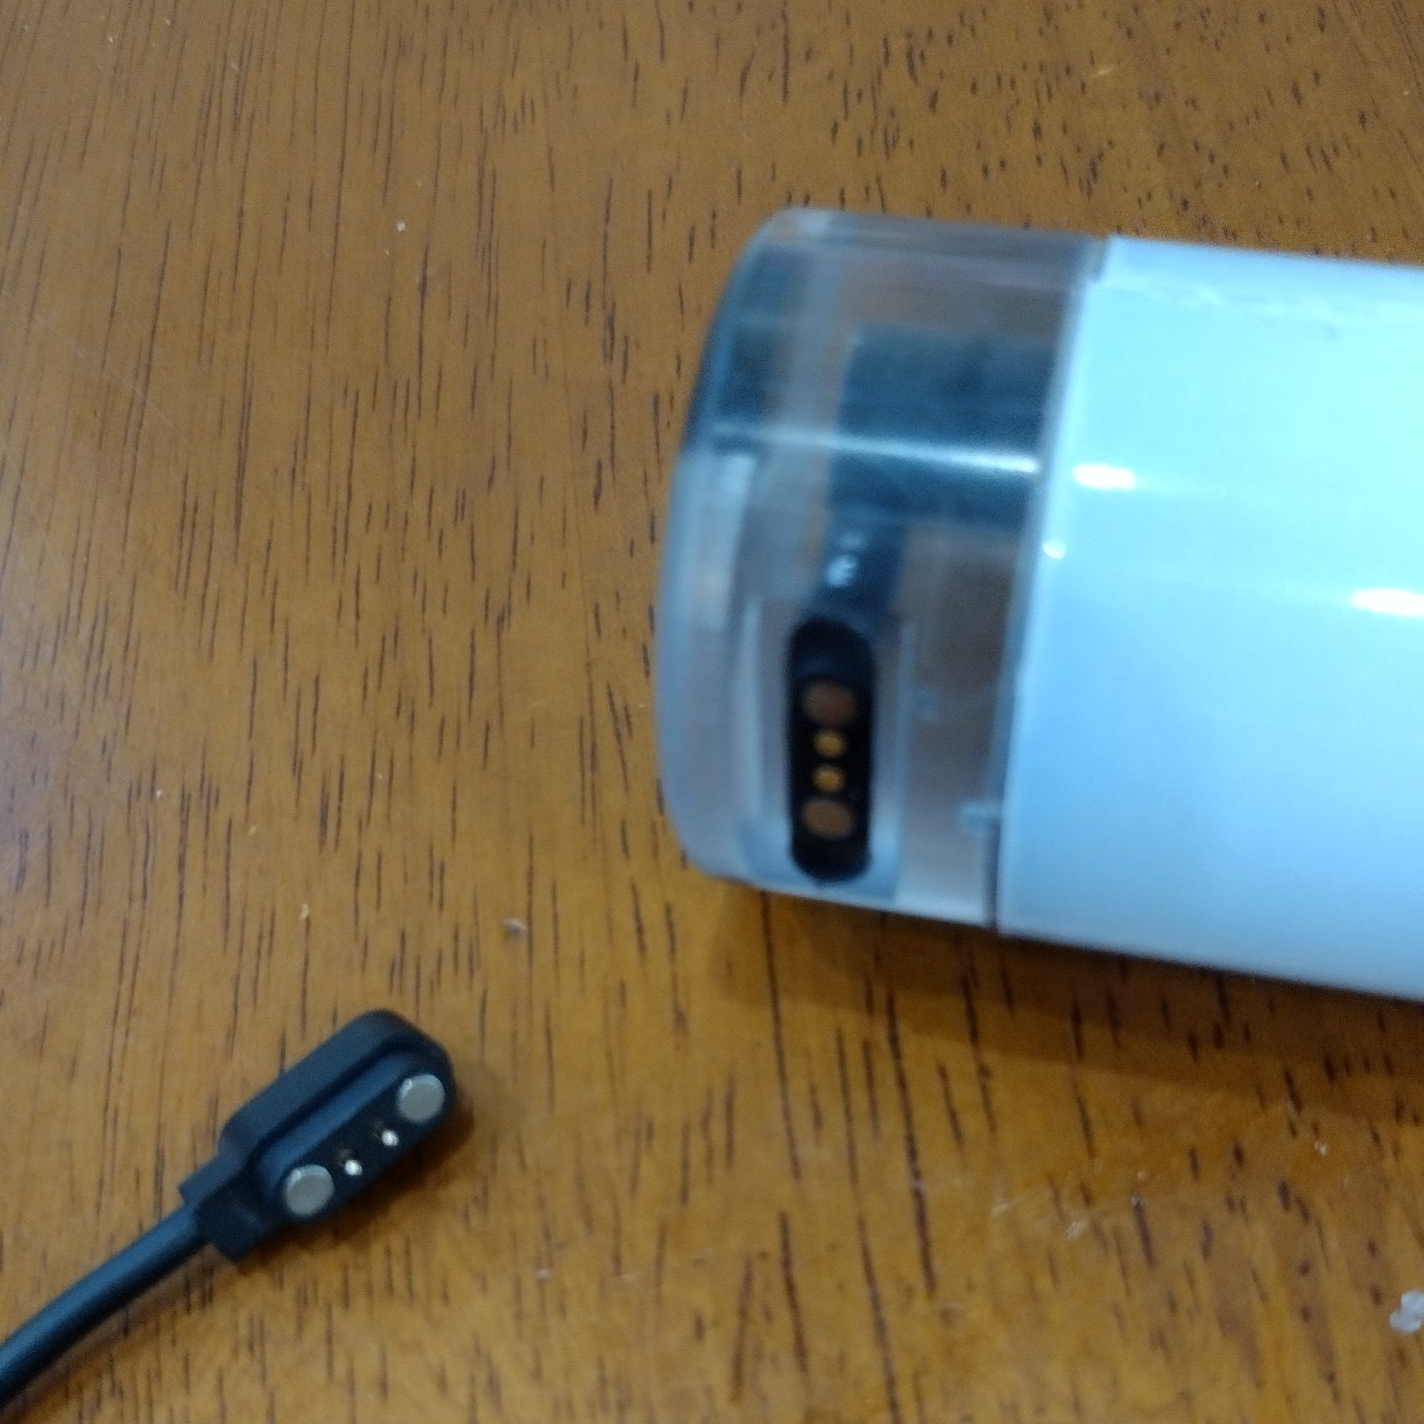
Magnetic charging cap with cord
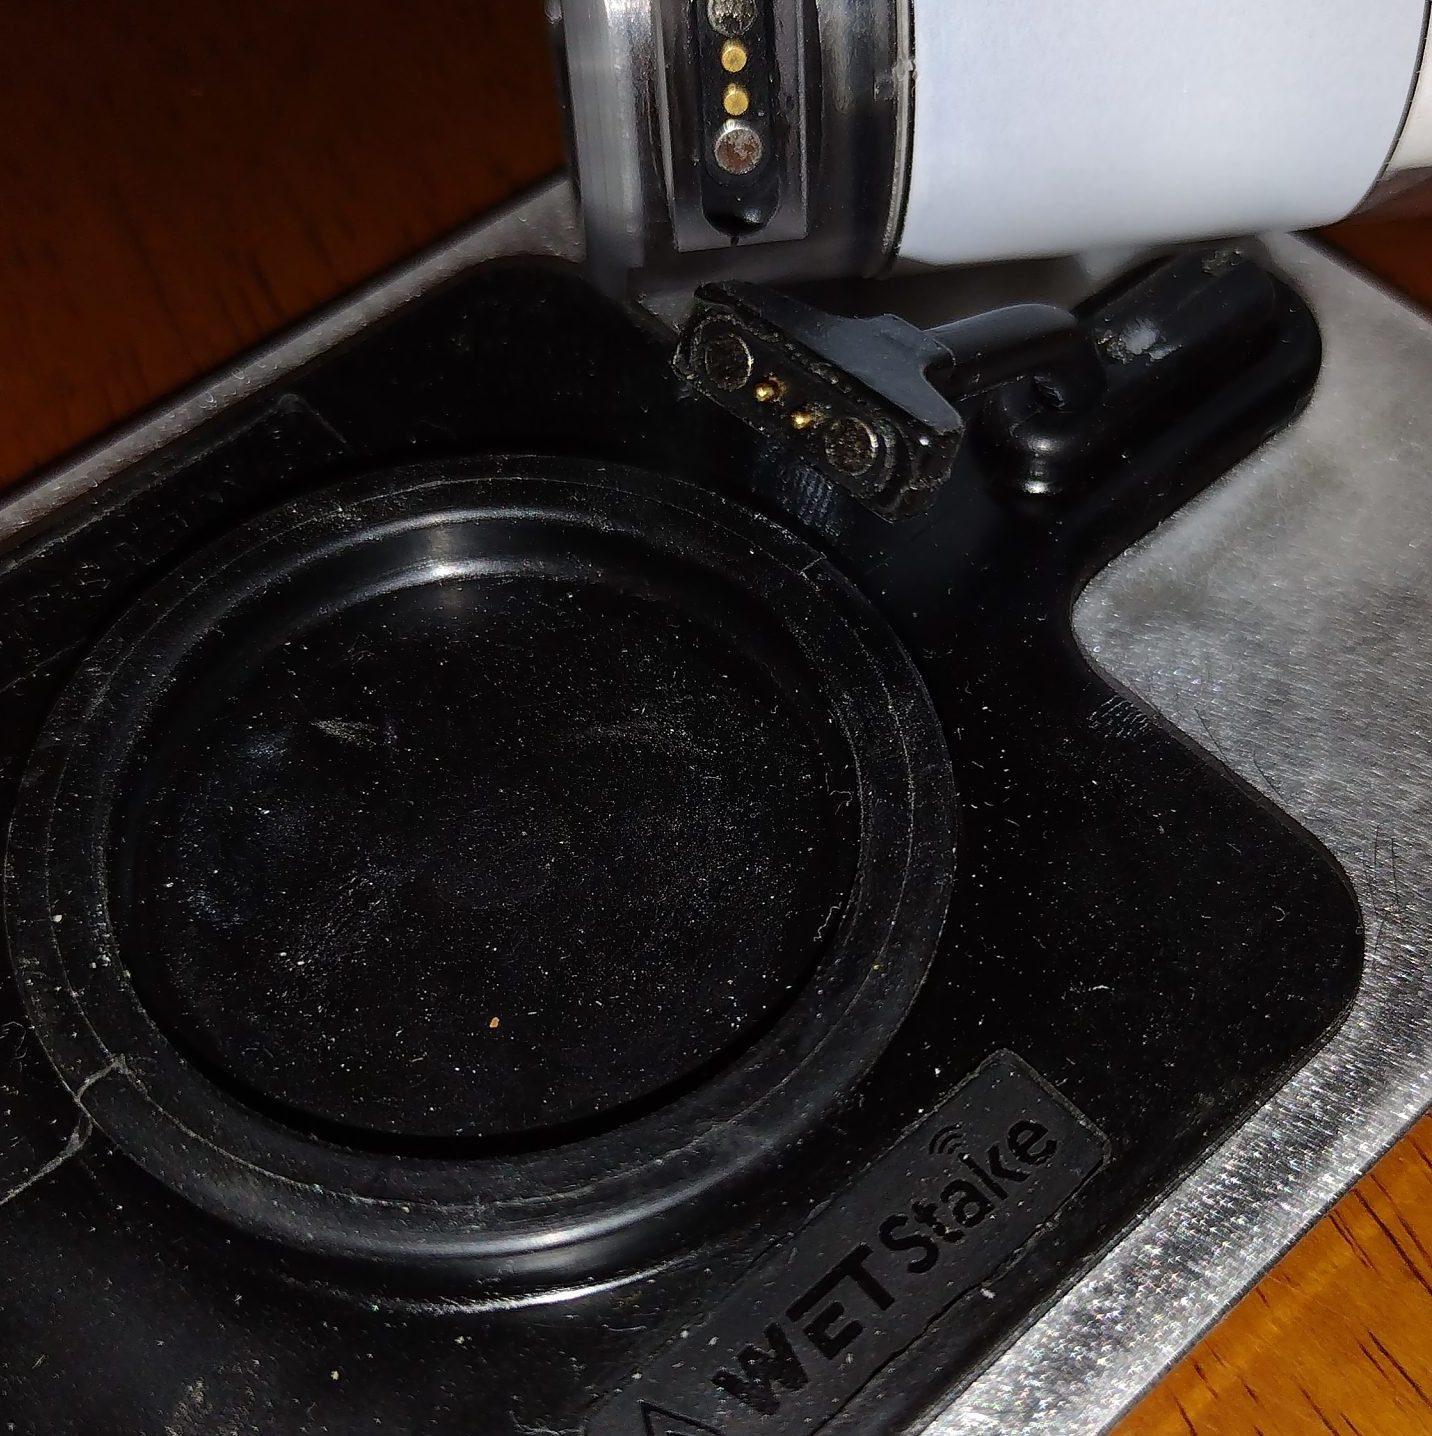
Updated solar panel
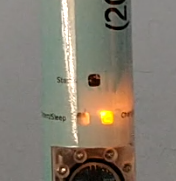
Orange light = charging
- Magnetic USB Cord:Charge using the included magnetic USB charge cord until the orange light turns off.
- Old style cap:With the old style cap plug in a micro-USB cord to the solar panel and place the solar panel on the device.
- Charging Indicator:When the orange light is on, the device is charging. Sometimes the device needs to be on to start charging. The light will turn off once the device is fully charged.
Before putting your stake in the field
Charge it with a USB wall charger until the battery is full. Solar alone won't recover a fully-drained battery after off-season storage — it's like trying to wake a tablet you haven't used in 8 months by sitting it on a sunny windowsill. Give it a proper wall charge first, then solar keeps it topped up from there.
Solar Panel:
- Align the solar panel: Place the solar panel on top of the device ensuring the magnetic connector is atached to the cap (or aligned on the old style cap)
- Position the solar panel: Position it to face sunlight.
Turning On
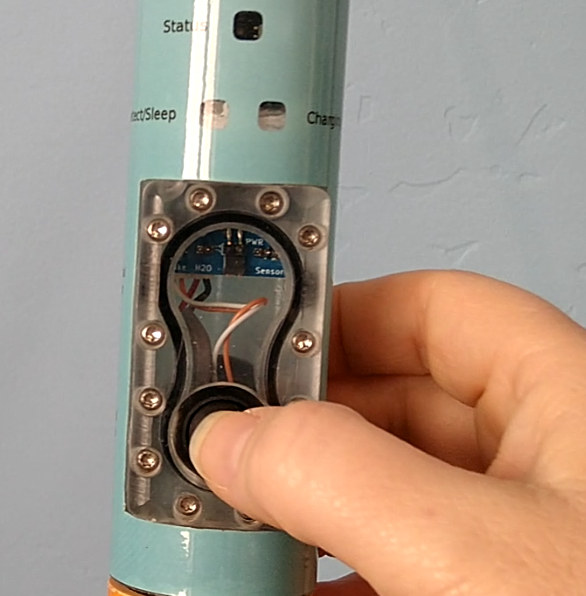
Press the power button. The device will show quick green/light blue flashing while connecting, then slow pulsing when ready. After pressing the power button, you will see a brief white light that turns to green or light blue flashing. It will continue to flash until it connects to the cloud and sends a report. The light will then be a cyan pulsing color. You will recieve a text message that the device is ready for monitoring for water. Connection will sometimes take up to two or three minutes.
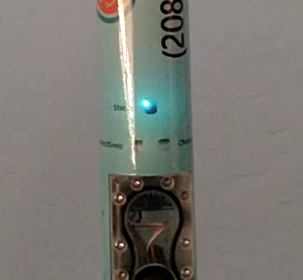
A slow pulsing cyan (light blue) light means the device is connected and ready.
- Blue Button:This button is on when in and off when out.
- Black Button:This button just needs to be pressed about 1 second to start up.
Turning Off
- Blue button: Push the blue button to release it and turn off. No offline notification is sent with blue button models.
- Black button: Hold the power button for 2-3 seconds — let go when the dark blue light comes on. The light will turn orange while shutting down, and you'll receive an offline notification.
Important
Keep the main electronics housing above the water line. Only the sensor probe should contact water. Retrieve the unit promptly once water detection occurs so it doesn't get submerged or lost in crops.
Water Detection
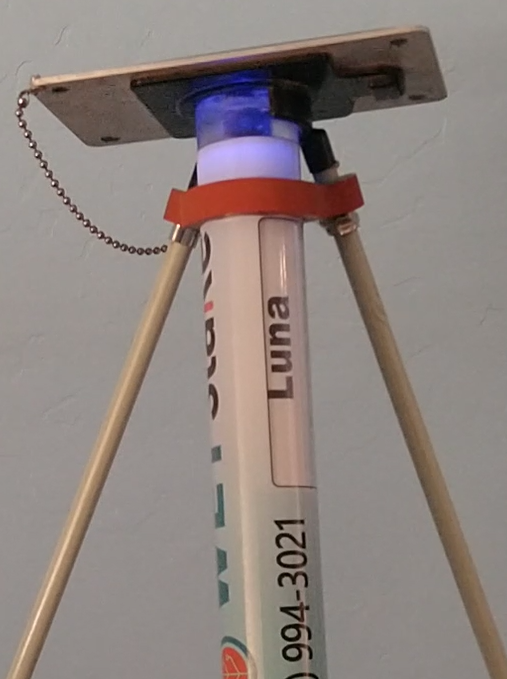
When water is detected, the device sends a text or call notification and flashes a blue light ten times every 30 seconds. This is Alert mode. Press the power button to disable the flashing and turn off the Alert mode. When the the device is in Alert mode, if you see no light in the status window, tap the black button. You should then see a white light. At this point, press the black button for 2-3 seconds or until you see a dark blue light and realase it to turn off.
Text Commands
You can configure your device by texting commands to its dedicated phone number (shown on the stake). Start each command with your device ID. Commands are not case-sensitive.

Your device ID is printed on the stake label
CHANGE MAIN CONTACT
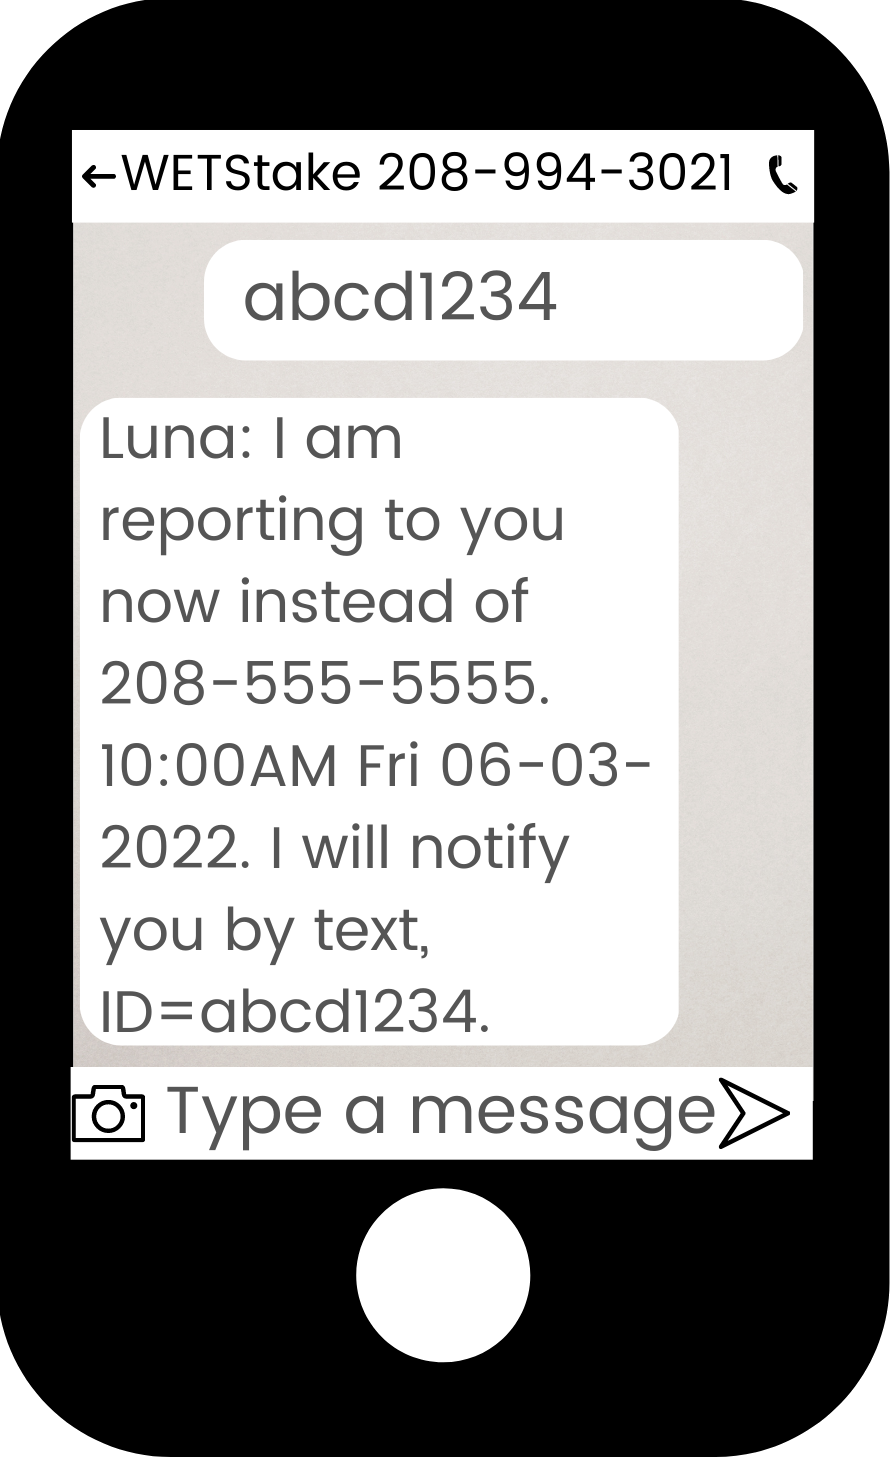
[ID]
GET STATUS
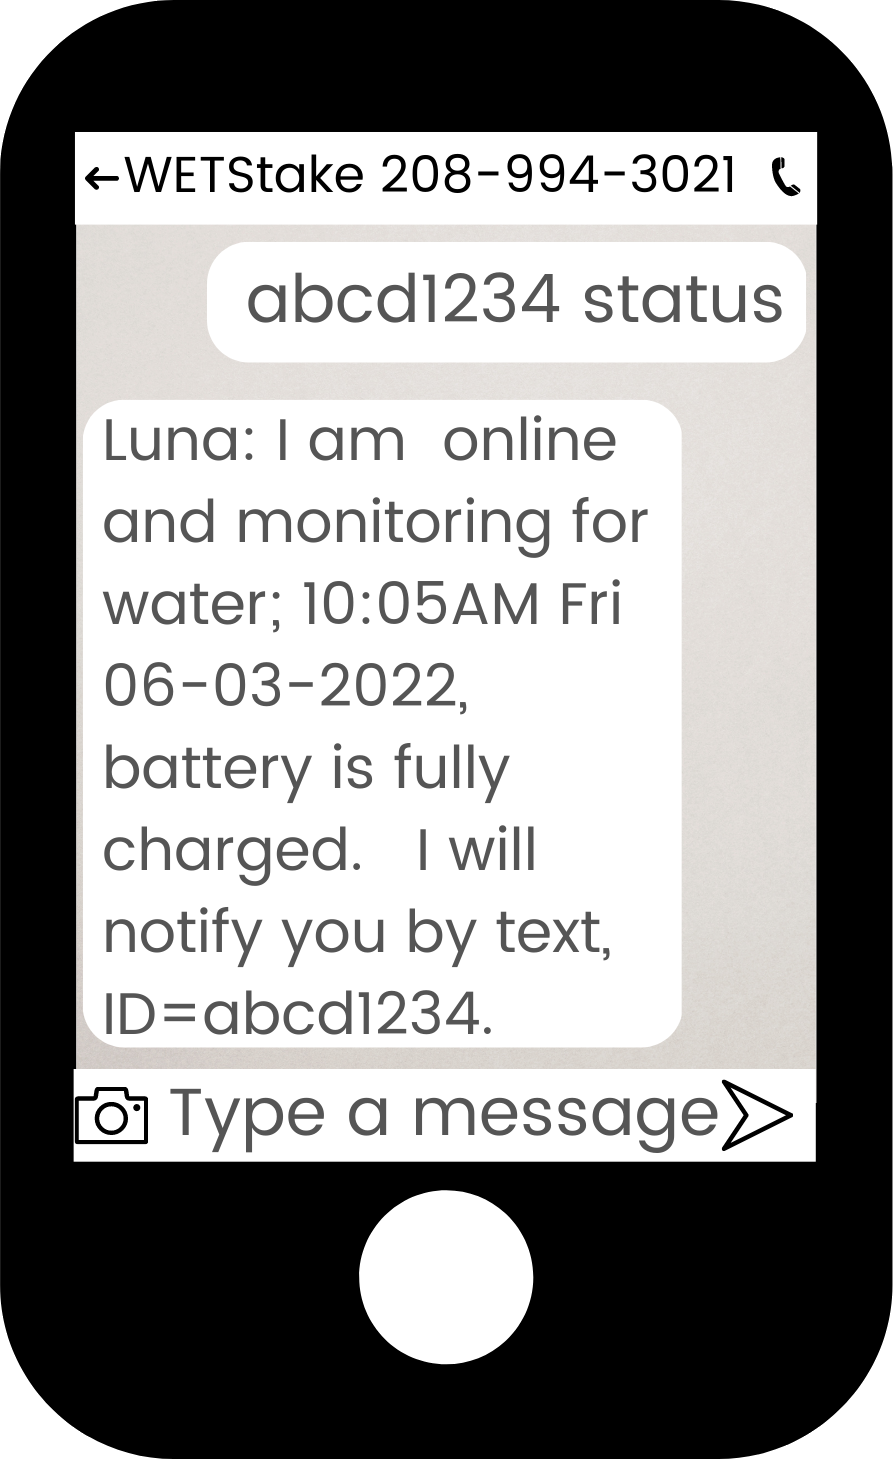
[ID]
  status
CHANGE NOTIFICATION TYPE
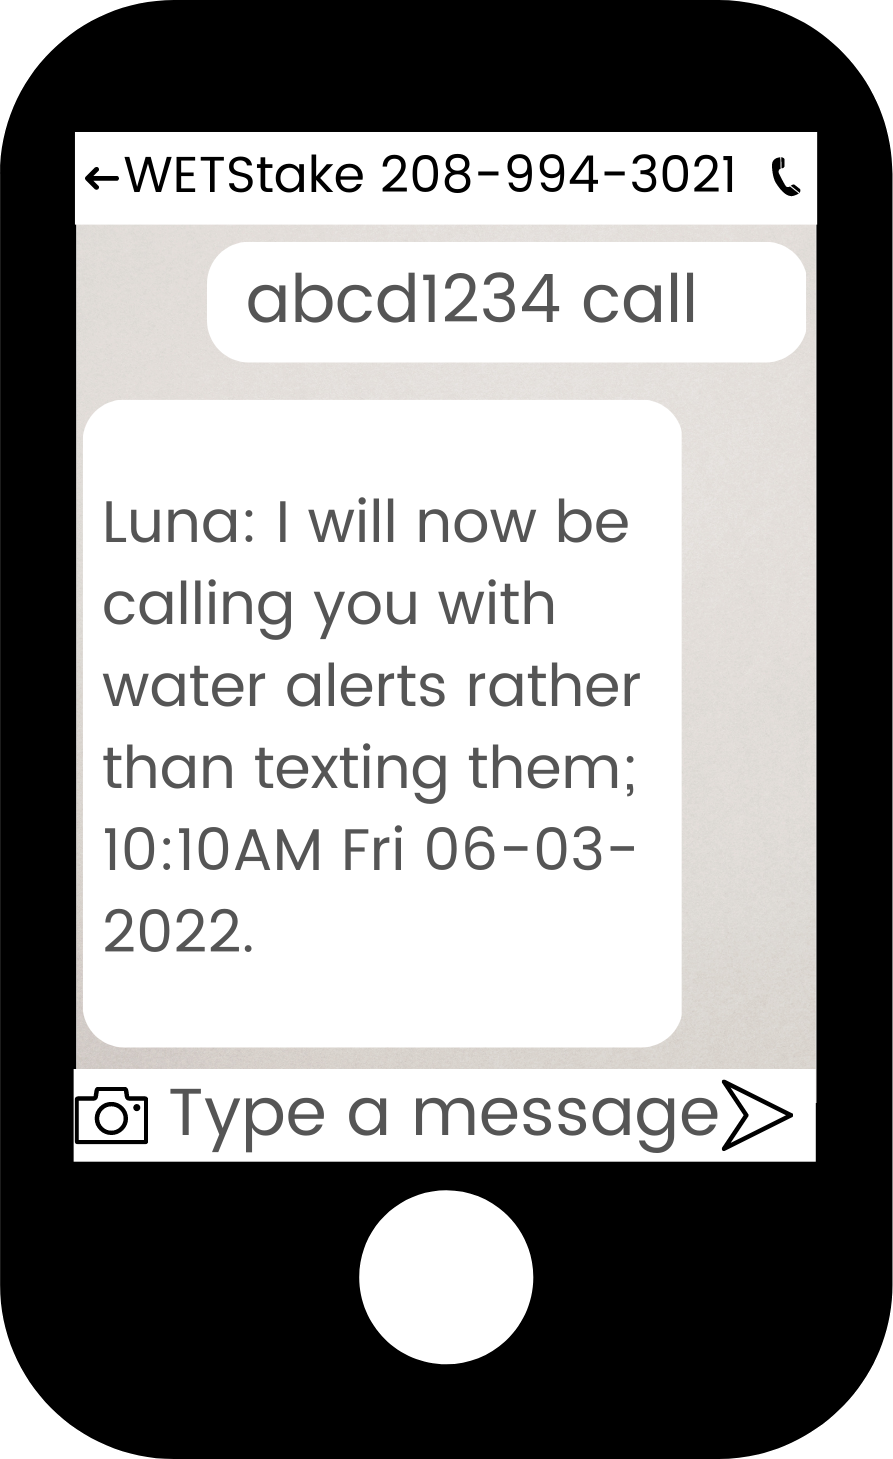
[ID] call
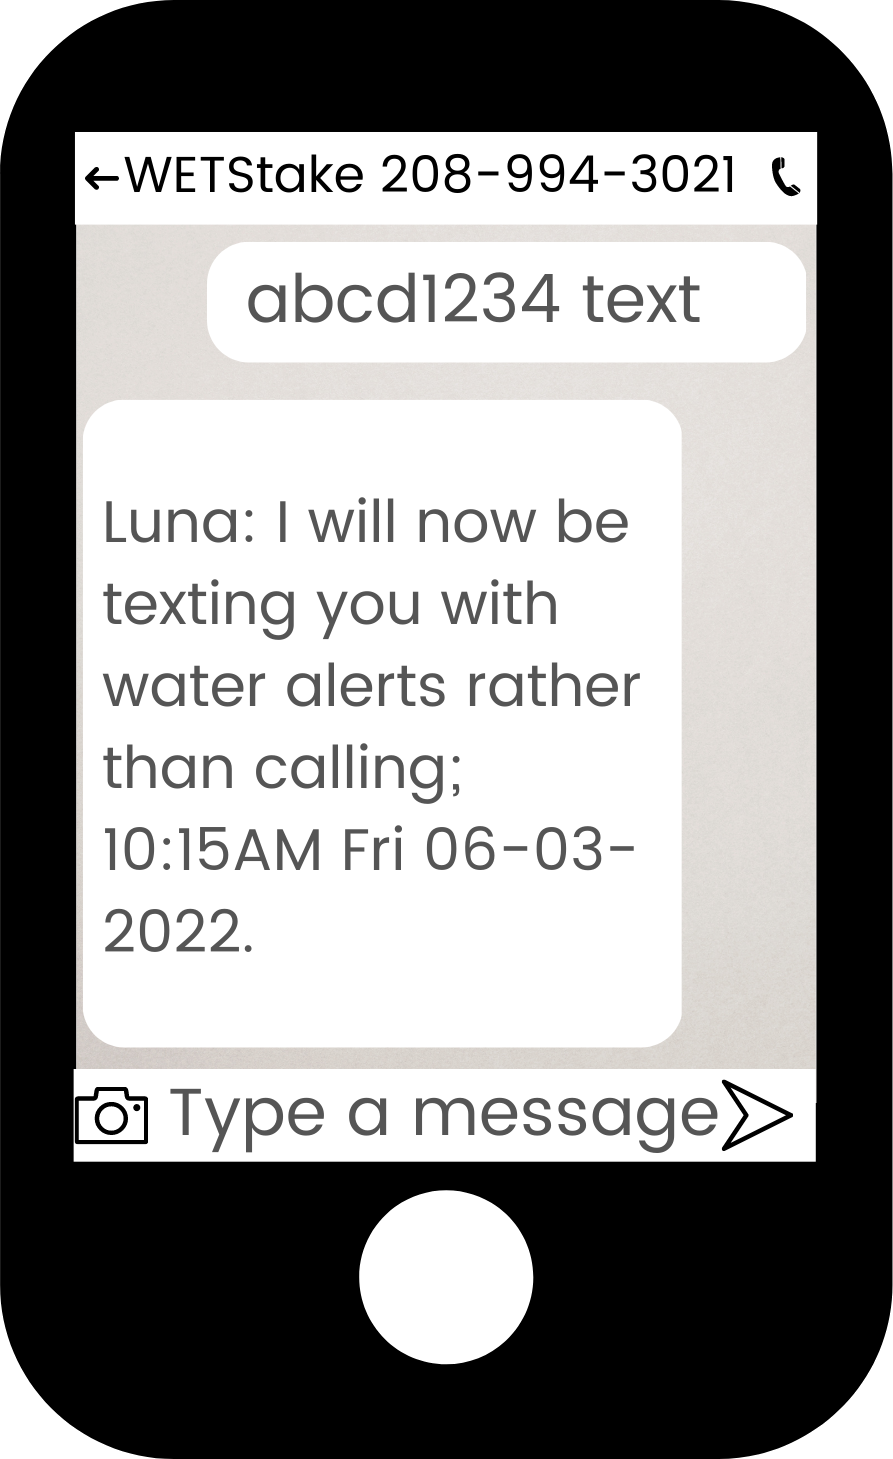
[ID] text
CHANGE LANGUAGE
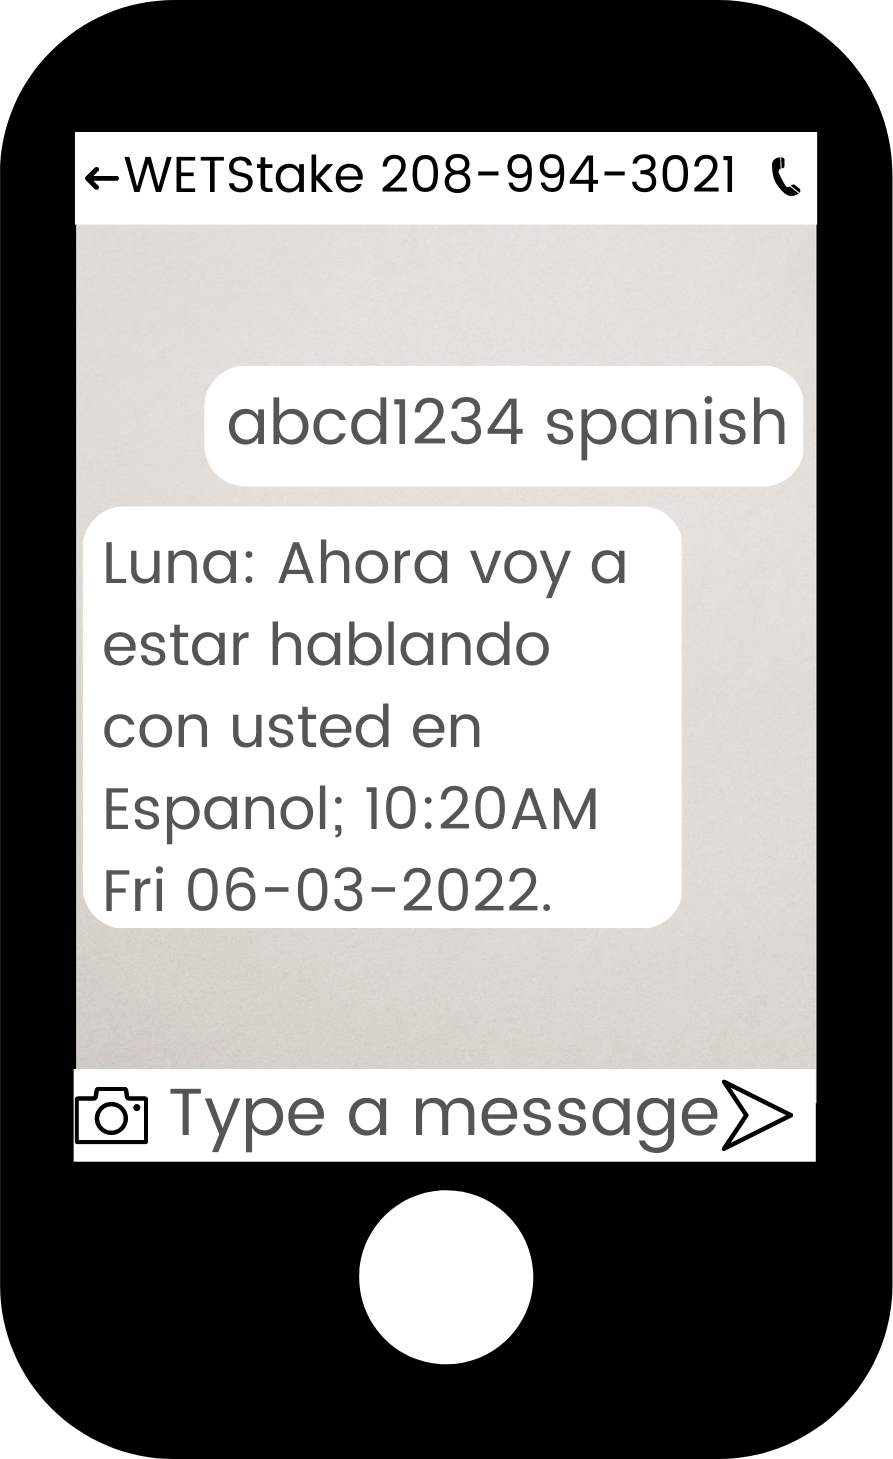
[ID] spanish
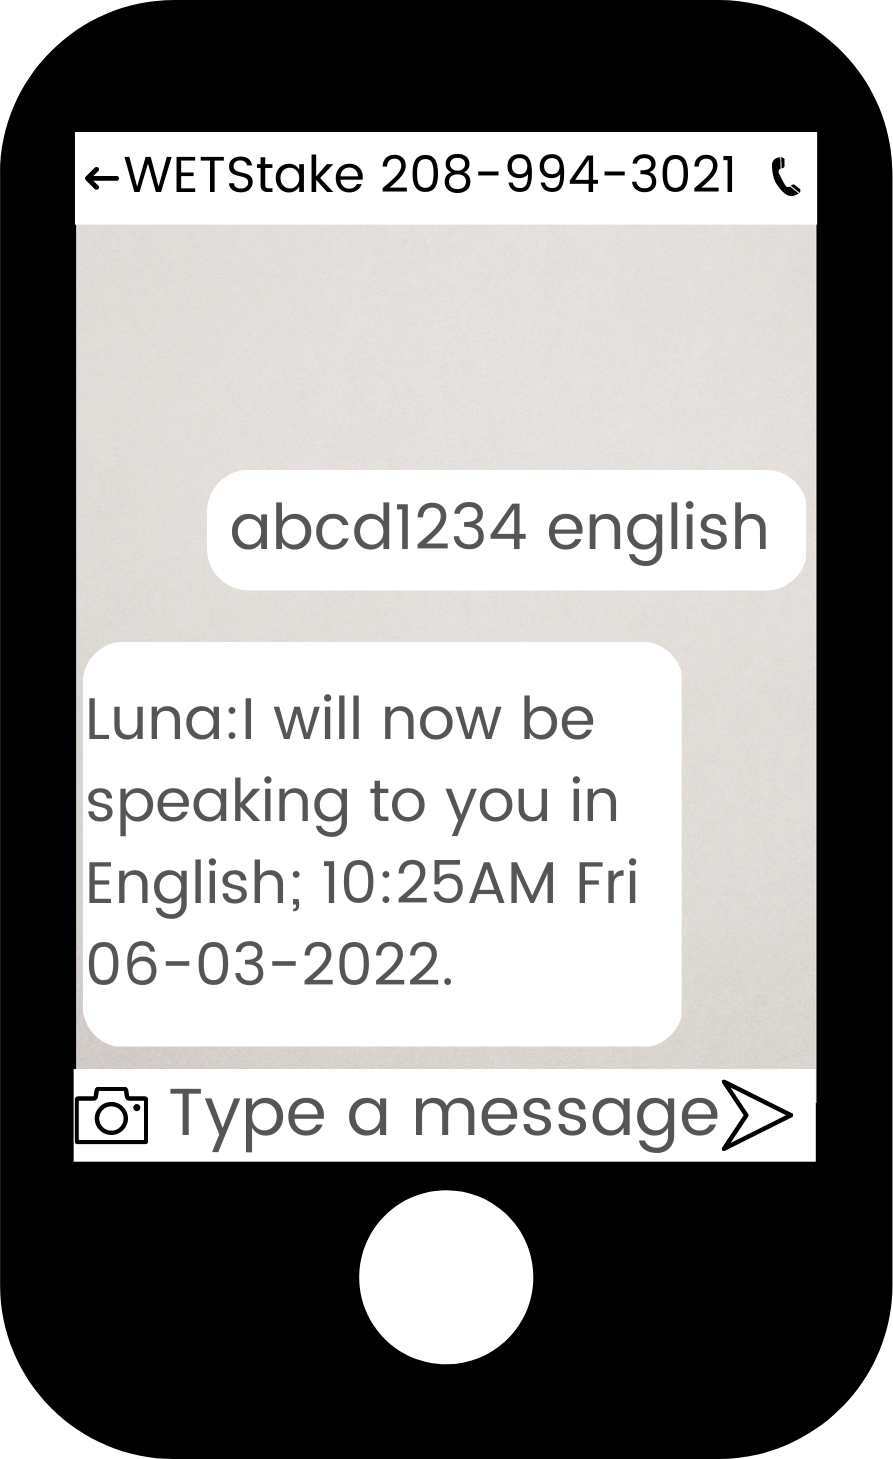
[ID] english
CHANGE TIME ZONE
Text the ID space "timezone" space and one of the following time zone codes: ADT, AKDT, AKST, AST, CDT, CST, EDT, EST, EGST, HADT, HAST, MDT, MST, PDT, PST
[ID] timezone mst
Watch: Plus Service Tutorial
Plus Service
(optional service)
Plus service includes GPS tracking to locate your device in the field. View device location from your dashboard and receive coordinates with your alerts. Plus service also enables supervisor support — add extra people to receive text alerts for your device. This service also lets the main contact receive a phone call and text at the same time when an alert is triggered.
- GPS Location: received a GPS link with your status requests and water detection notifications.
- Supervisor: add extra people to receive text alerts for your device.
Only the main contact receives phone calls. Supervisors only receive text messages only.
- Add: Text the device id space "add" to the WET Stake number. You will receive a confirmation text when the supervisor is added.
[ID] add - Remove: Text the device id space "remove" to the WET Stake number. You will receive a confirmation text when the supervisor is removed.
[ID] remove
- Add: Text the device id space "add" to the WET Stake number. You will receive a confirmation text when the supervisor is added.
- Texts will begin with the word "MONITORING" followed by the message.
Humidity Monitoring
(optional service-must be a humidity stake)
With the humidity sensor enabled, your device can monitor humidity levels in addition to water detection. You set upper and lower humidity thresholds, and the device notifies you when humidity enters or exits that range.
To enable humidity monitoring, text the device id space "humidity" to the WET Stake number.
[ID] humidity
The default humidity level is set at 50%. To adjust the humidity level, text the device id space "humidity" followed by a space and the desired percentage. You can only set the lower threshold. The top threshold is 10% above the lower threshold.
[ID] humidity 55
To switch the WET Stake to normal water mode, simply text the device id space "water" to the WET Stake number.
[ID] water
You will receive an alert when humidity enters your set range and again when it exits.
When Not in Use
Store the device in a safe, dry location away from potential damage (shop, barn, garage).
End of Season
Storing Equipment (If Renewing Next Year)
- Rinse off any dirt or mud, let dry completely
- Store in a cool, dry location
- Keep all components together
- In the spring, charge up the unit before your first use
Returning Equipment
If not renewing, equipment must be returned within one month after your service agreement ends to receive your full deposit refund.
- Clean the equipment
- Package securely for shipping
- Include all original components (stake, poles, charge cord)
- Ship to: 3448 E 200 N, Rigby, ID 83442
Late Return Penalties
If you do not plan to use the device next season and equipment is not returned within one month after service ends, late penalties will apply: $50 for the first season late, $150 for a second season, plus potential deposit forfeiture. If you are continuing service next season, simply store the device and no return is needed.
Lost or Damaged Equipment
If your device is lost or destroyed, a $300 replacement fee is required to continue service. This fee covers the cost of a new device.
Theft: If your device is stolen, the replacement fee is waived if you file a police report and submit it to us within 30 days.
Troubleshooting
Device shows "offline" in dashboard
- Verify the unit is powered on (check status light)
- Check the battery level
- Confirm cellular signal at the location
- Try moving the stake to higher ground or different spot
- Contact support if issue persists
Not receiving alerts
- Verify your phone number is correct
- Check that notifications are enabled
- Ensure the device is online
- Test the sensor to confirm it's working
- Check your phone's spam/blocked messages
False alerts / too sensitive
- Ensure sensor probe is positioned correctly
- Check that probe isn't sitting in a puddle or wet spot
- Make sure probe isn't touching metal or wet vegetation
- Contact support to adjust sensitivity if needed
Equipment damaged or lost
Contact us immediately. We can often ship a replacement quickly so you don't miss irrigation. Lost or destroyed devices require a $300 replacement fee (waived for theft with police report).
Need Help?
Our support team understands farming and is here to help:
- Phone: 208-557-1938
- Email: customerservice@wetstake.com
Paddy Monitor Devices
WET Hub
Central wireless receiver that monitors all sensors in your paddy and sends water level alerts to your phone.
- Needs full sun to maintain battery
- Wireless range: approximately ½ mile from all node units
- Communicates with all WET Nodes via LoRa
WET Nodes
Solar-powered water level sensors, one per paddy. Each node consists of:
- Measuring tape sensor — Install on post, just above water line
- Solar-powered control box with LoRa transmitter
- Communication cable — Connects sensor to control box
- Communicates wirelessly with WET Hub every 3 minutes
- Needs a couple days of sunlight every couple weeks to maintain charge
Software Setup
Step 1: Account Setup
Contact WET Hub support to set up your trial account. We will need:
- Your name
- Your email address
- Your sms phone number
- Your shipping address
Step 2: Login
- Once we've set up your account, Visit the website.
- Click on Login
- Enter your email address
- Click Get Magic Link
- Check your email inbox
- Click the magic link in the email
- Go to or click on Devices
Step 3: Open Your Hub
- Click on your Hub device
- Scroll down to see:
- Default Alert Settings (applies to all nodes)
- Hub Nodes table (list of your 5 connected nodes)
Step 4: Set Up Default Alerts (Optional)
The default alert settings apply to all nodes automatically. You can:
- Choose alert mode:
- Low Only — Alert if level drops below threshold
- High Only — Alert if level rises above threshold
- Low/High — Alert if level crosses either threshold (range)
- Set Level — Alert if level moves more than tolerance away from target
- Set your thresholds in inches
- Click Save Default Settings
Step 5: Configure Individual Nodes
For each node in the table:
Monitor On/Off
- Use the toggle to enable/disable monitoring
- Only nodes in monitor mode will send alerts
Edit Node Settings (click Edit button)
- Change node name — Give it a meaningful name (e.g., "North Field", "Tank A")
- Use Defaults — Toggle to follow hub-wide settings or create custom alerts
- Custom Alerts (if not using defaults):
- Choose alert mode (Low Only, High Only, Low/High, or Set Level)
- Set your thresholds for that node
- Click Save when done
Step 6: Configure Notifications
Below the hub nodes table, you'll find Notification Settings:
Primary Contact
- Your phone number is set by default to match the account
- Alerts will be sent to your phone number as text messages
Add Extra People
- Click to add supervisors or team members
- They'll receive the same alerts (text messages)
- Useful if multiple people need to monitor the hub
You can manage notification contacts at any time.
Step 7: Enable Monitoring
Once you're satisfied with your settings:
- Make sure all nodes you want to monitor are set to Monitor: On
- Turn on the Hub
- All nodes will automatically start reporting
Hardware Setup
Important: All values below 1" on the sensor read the same. Minimum notification level must be above 2" with proper mounting instructions.
Hub Installation
- Mount hub in a central location that covers all paddies
- Ensure it gets full sun to maintain battery charge
- Position for approximately 1/4 mile range to all node sensors
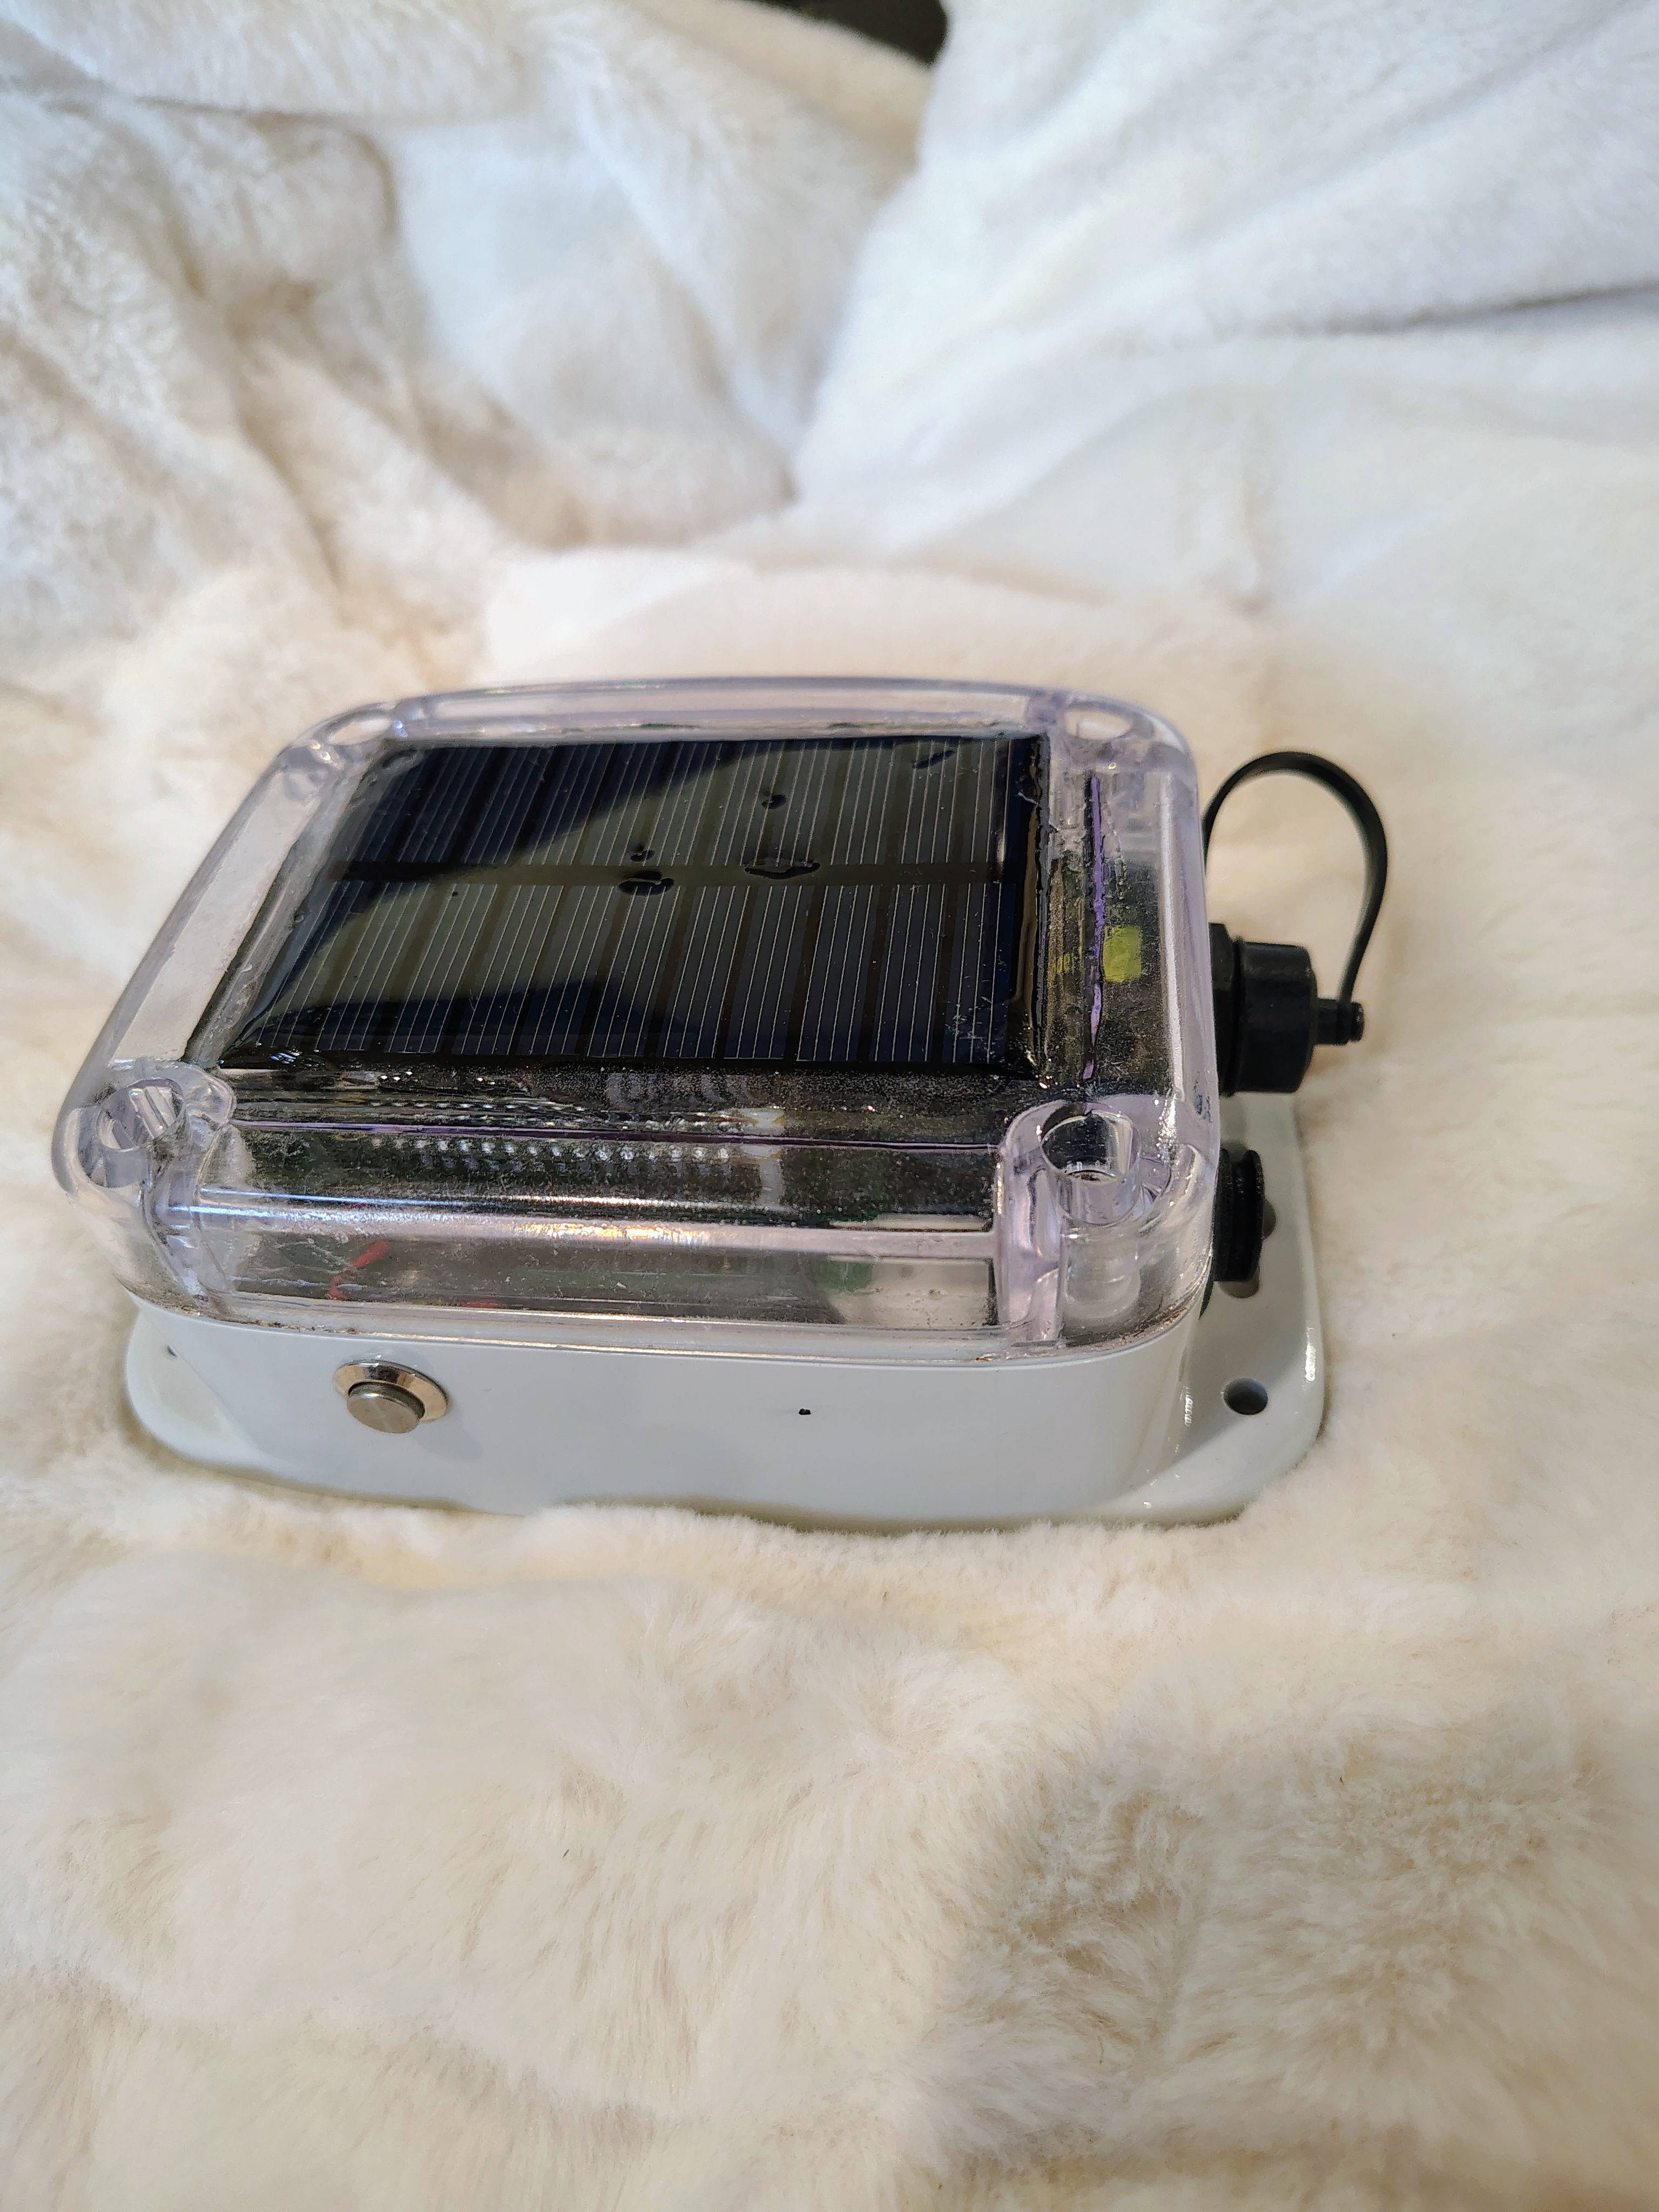
WET Hub — central receiver unit
Node Installation (per paddy)
- Prepare the post: Place a T-Post or rod (up to 1.5" diameter) in each paddy to be monitored
- Prevent silt buildup: Dig a recessed area around the post base to help prevent silt from clogging the sensor
- Mount the tape sensor: Use the worm gear clamps to secure the measuring tape sensor ~½" from the bottom of the paddy ground level
- Mount the control box: Attach the solar-powered control box at the post, or as high as the cable allows (needs visibility to sky for charging)
- Secure the cable: Fasten the sensor communication cable to the post along with any excess cable to prevent tangling or damage
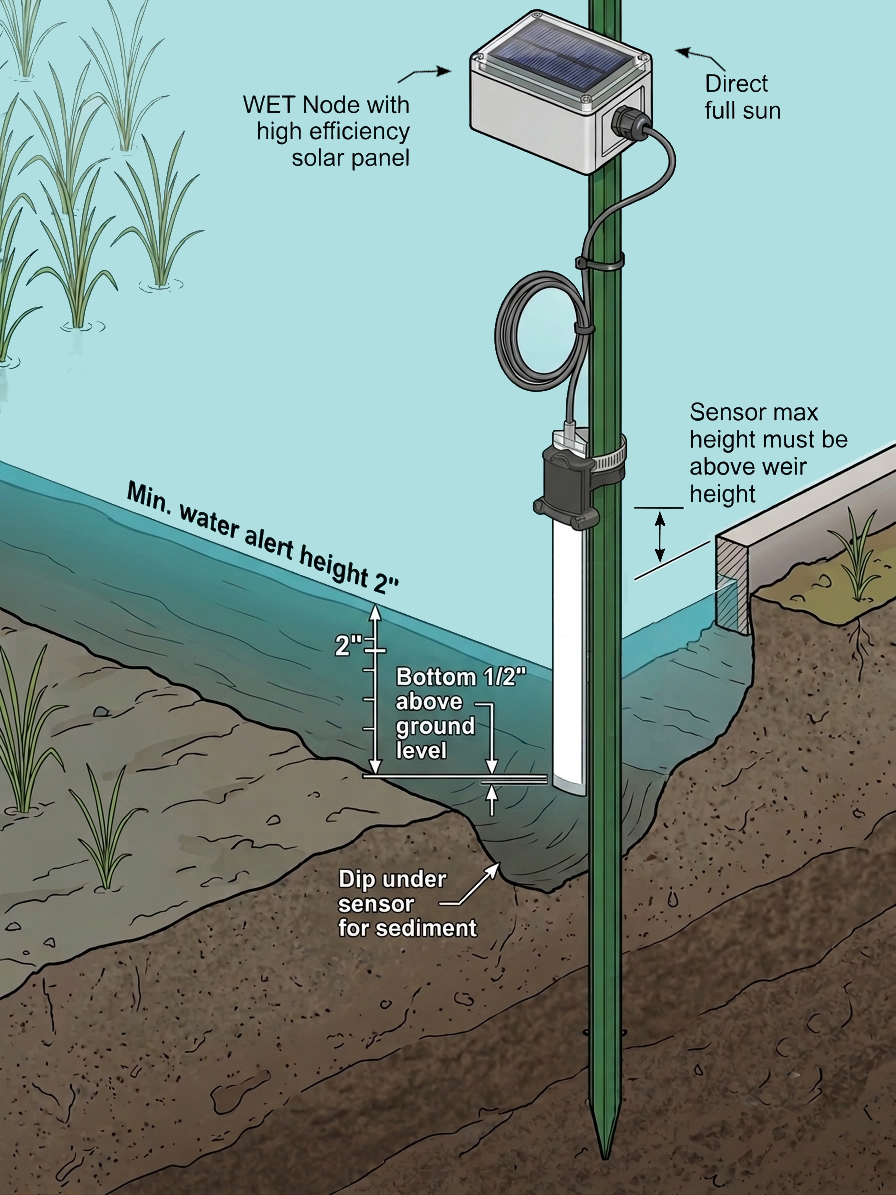
Complete node installation — diagram
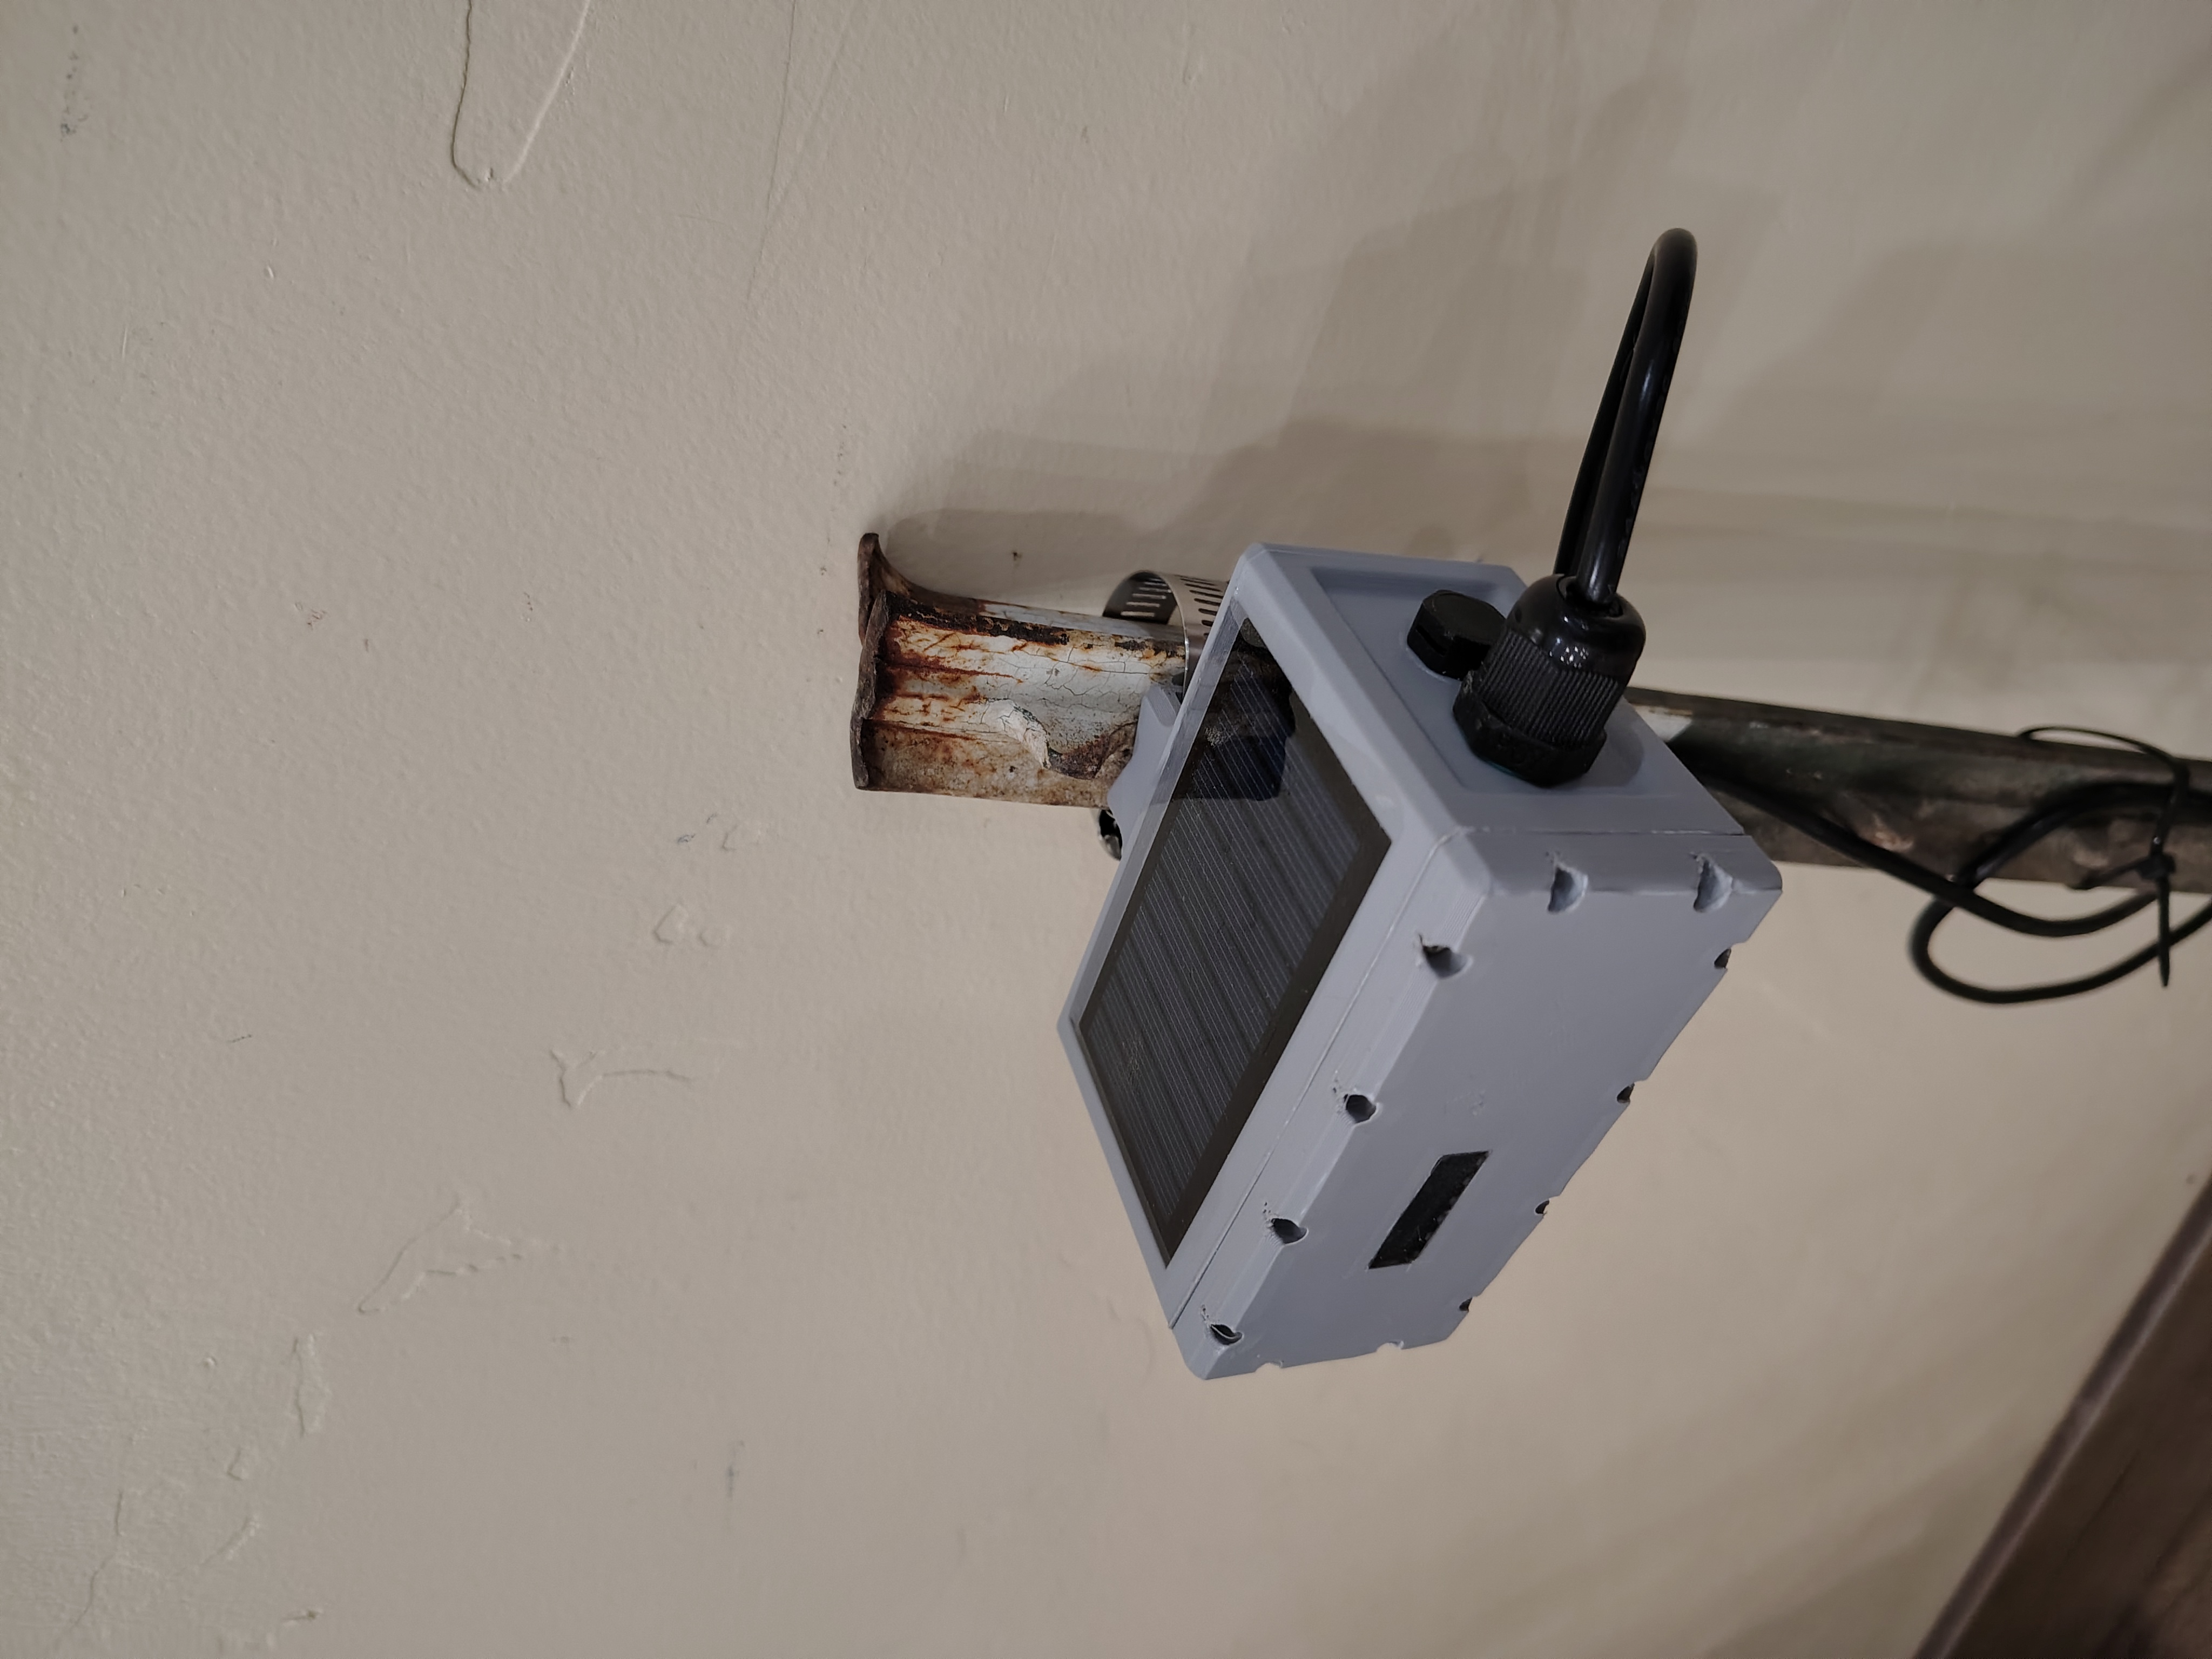
WET Node — control box with LoRa transmitter and solar panel
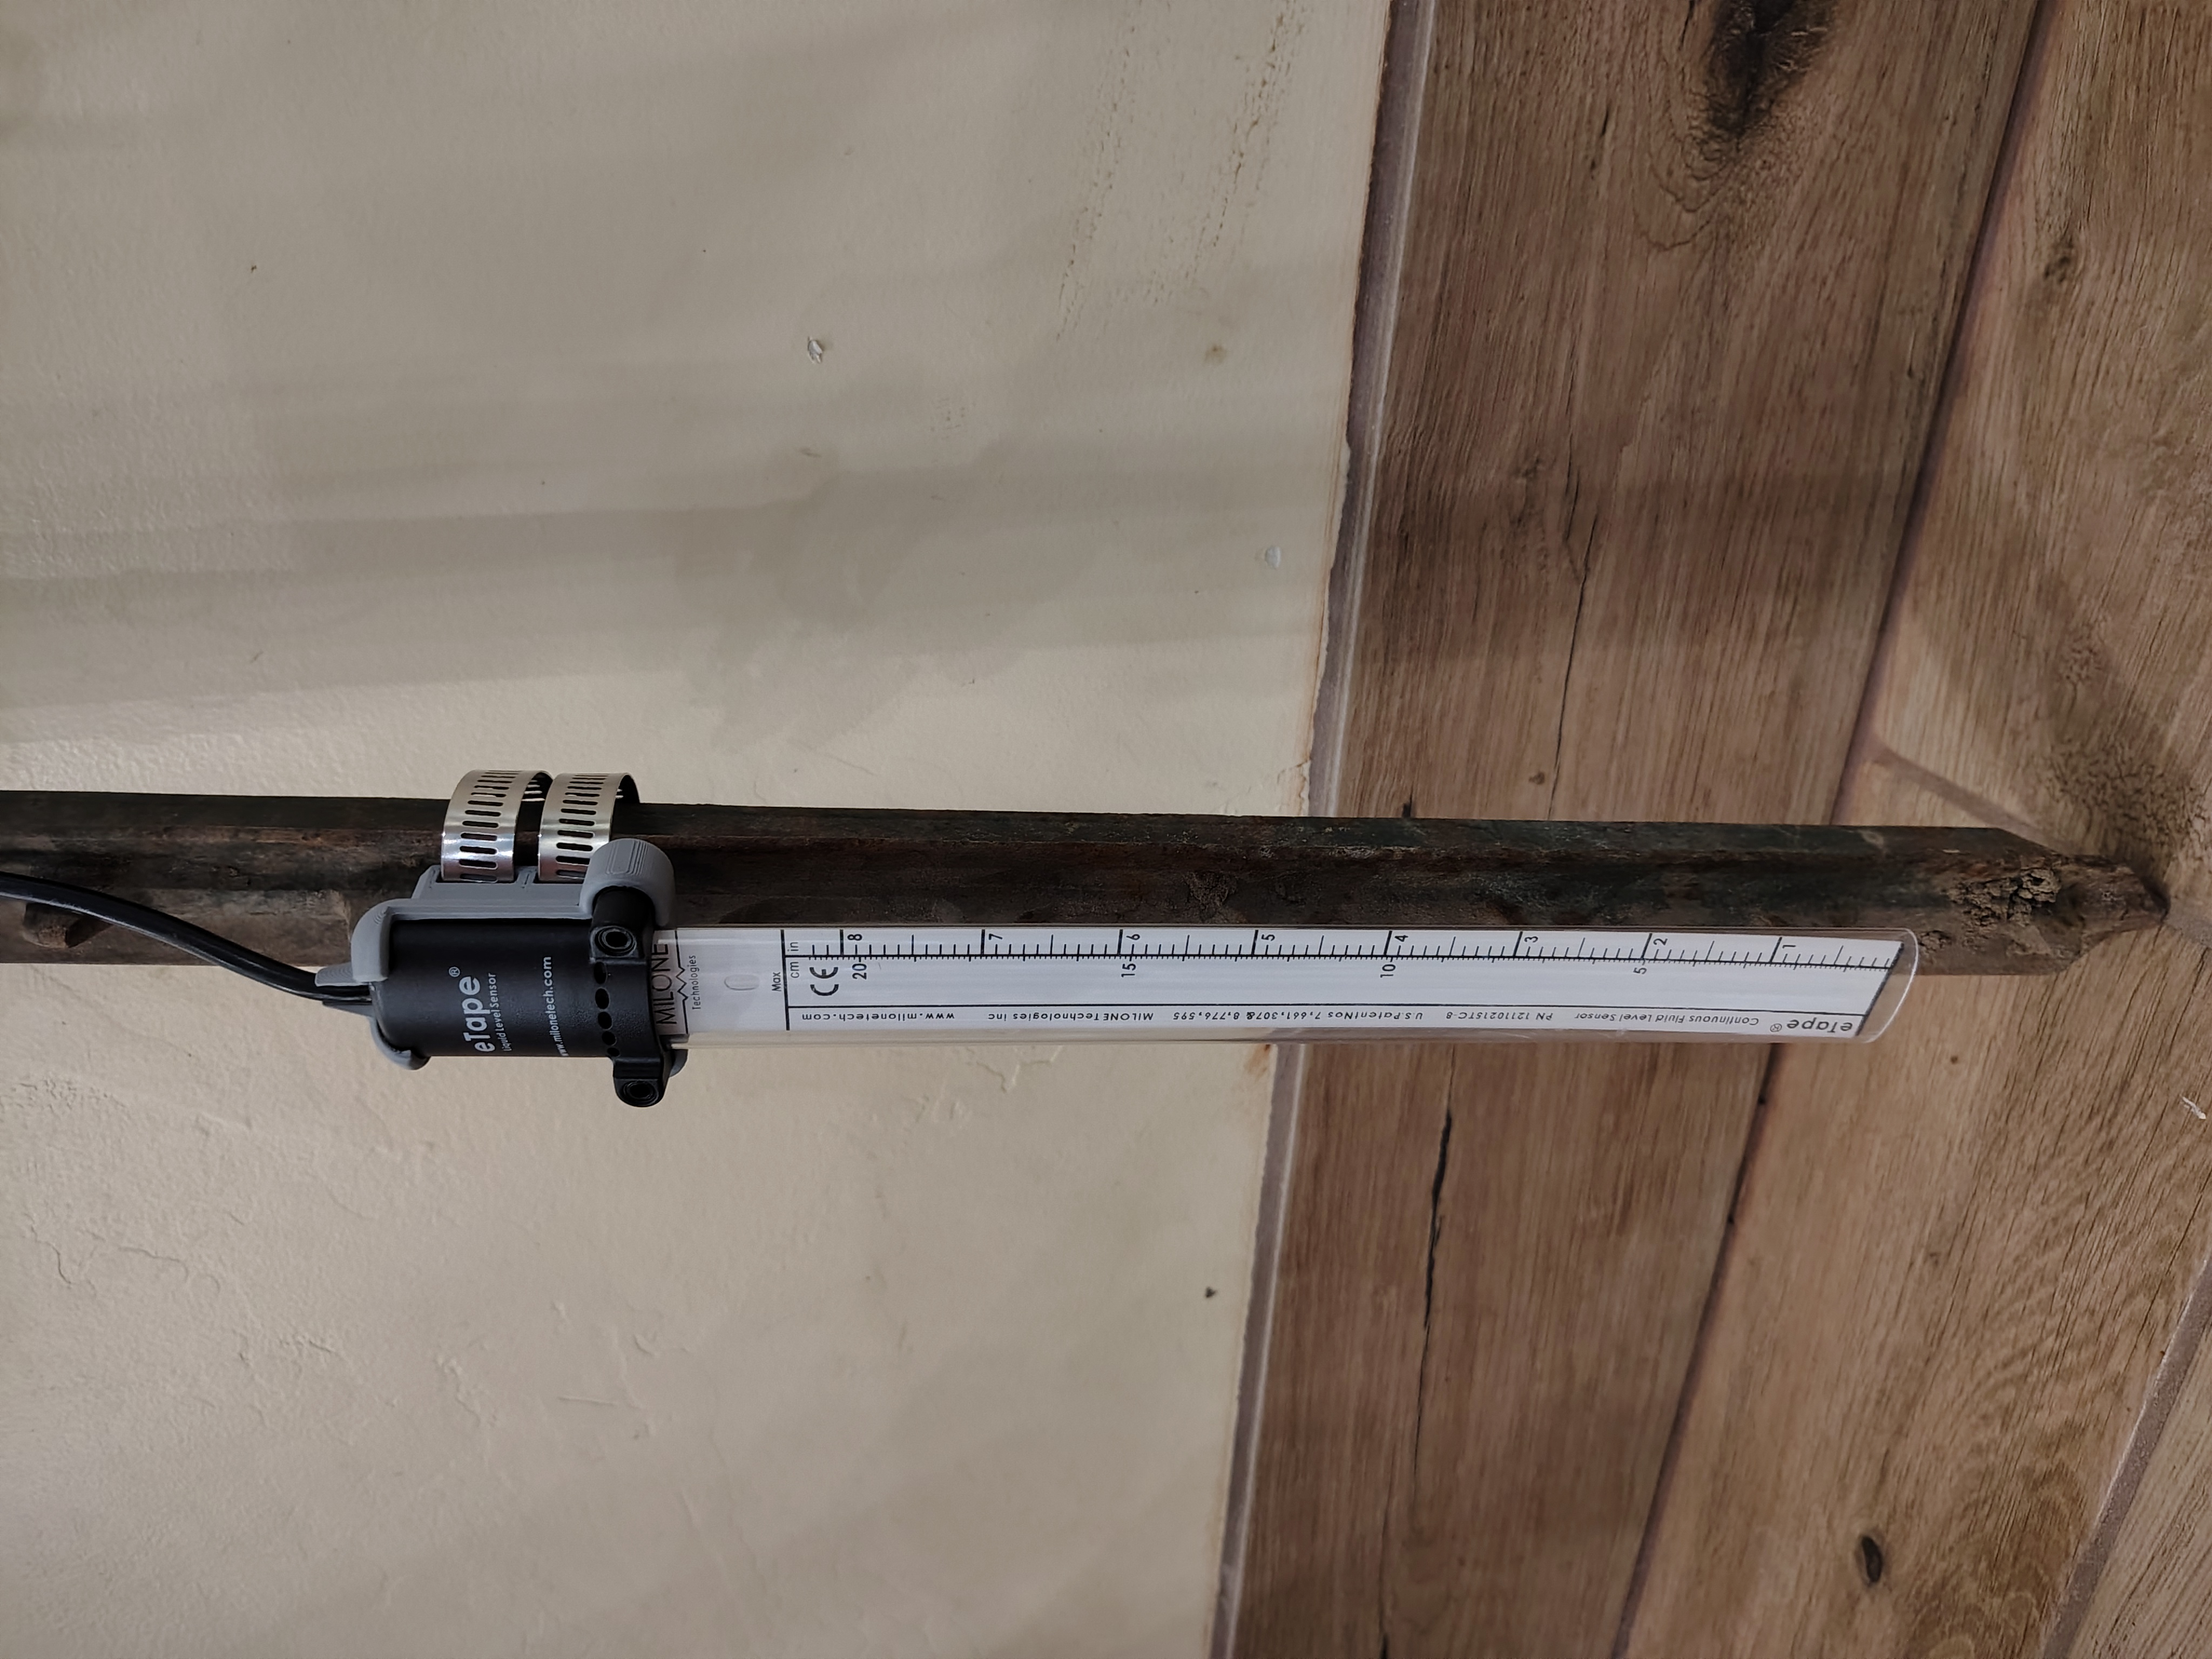
Tape sensor mounted on T-Post ~½" from ground level
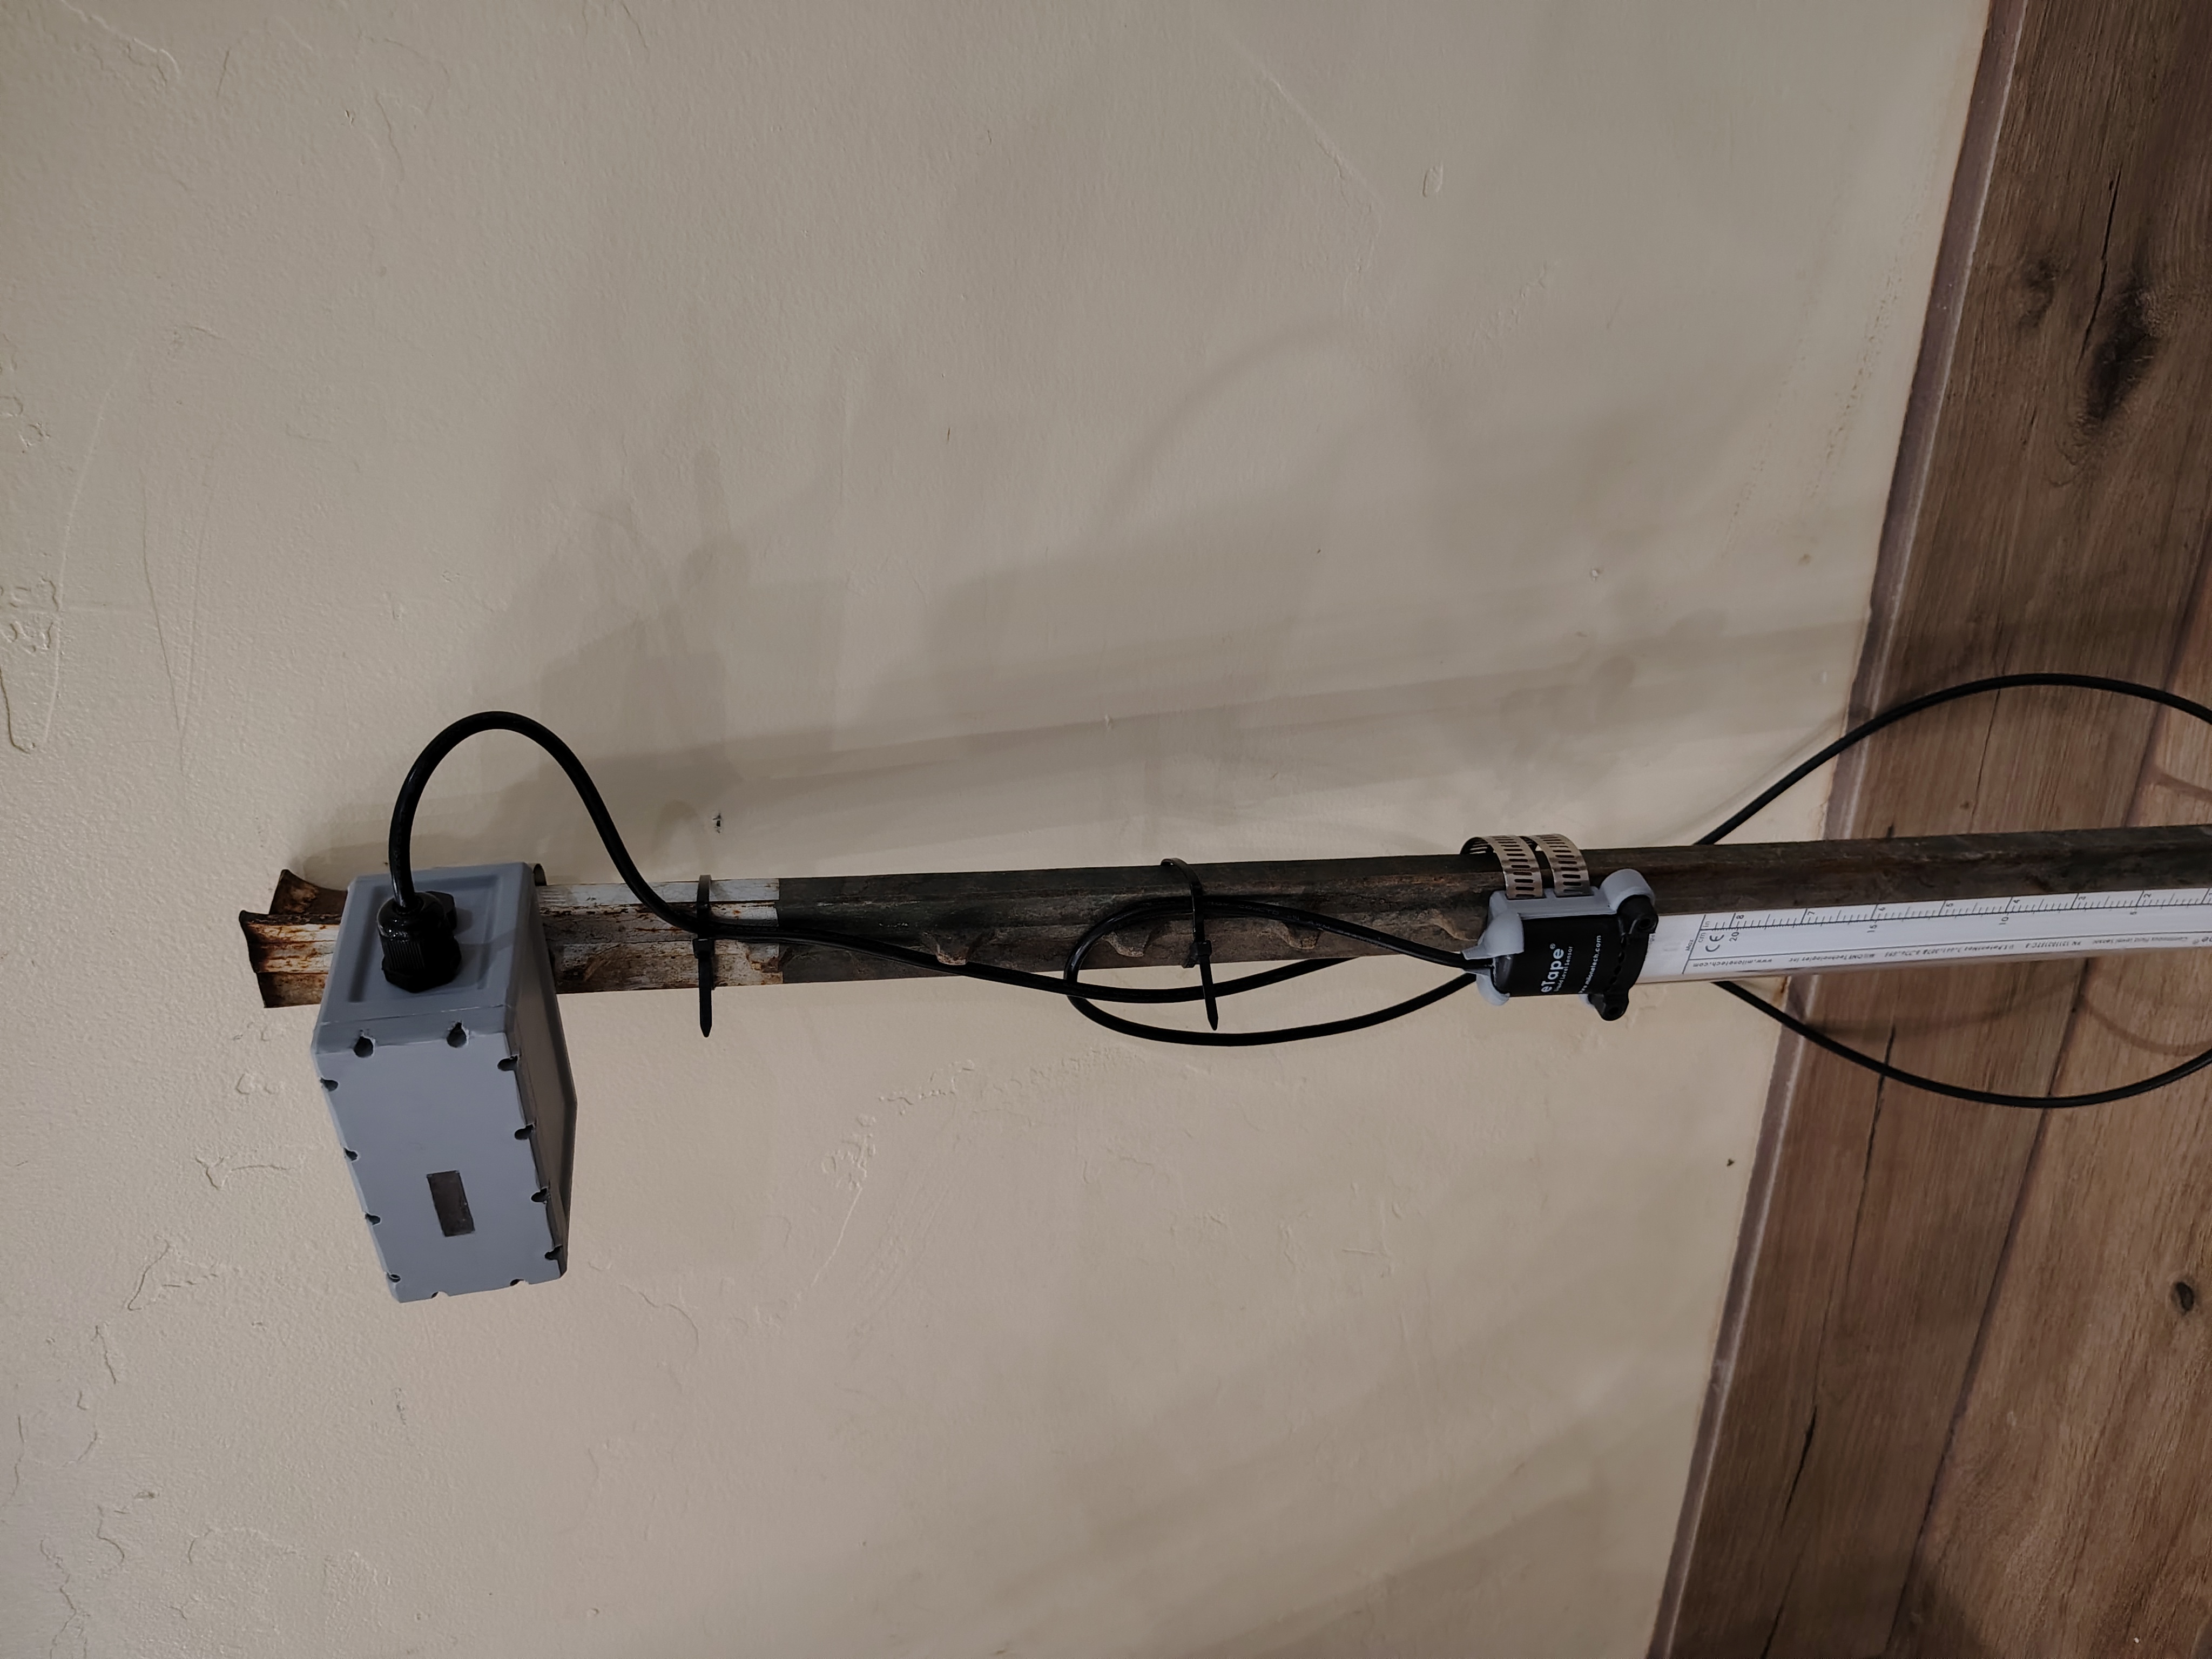
Complete node installation — tape sensor and control box
How It Works
Data Flow
- Every 3 minutes: Each node sends its current level to the hub
- Every 15 minutes: The hub sends a summary of all node levels to the website
- On your website: You can see real-time levels and node status
Alerts
You'll receive a text message alert if:
- Alert Triggered — A node in monitor mode reaches your alert threshold (low or high)
- Node Missed Report — A node in monitor mode hasn't reported in 30+ minutes
- Hub Missed Report — The hub hasn't reported in 30+ minutes
Node Table Overview
| Column | What It Shows |
|---|---|
| ID | Node number (1-5) |
| Status | Color dot: Green (online), Yellow (not reporting), Gray (not monitoring) |
| Name / Code | Your custom name + device code |
| Monitor | Toggle to enable/disable monitoring |
| Level | Current water/level reading in inches |
| Alert Mode | Your alert setting (Low/High or Set Level) |
| Use Defaults | Whether using hub defaults or custom settings |
| Last Seen | When this node last reported |
| Action | Edit button to change settings |
Troubleshooting
Nodes showing "Offline"
- Check that nodes are powered on
- Powrer cycle the node
- Verify they're within range of the hub
- Wait a few minutes for the next 3-minute report cycle
Not receiving alerts
- Verify the node is set to Monitor: On
- Check your alert threshold settings
- Confirm your phone number is correct
Hub data not updating
- Make sure the hub device is powered on and connected
- Wait up to 15 minutes for the first hub report
- Contact support if issues persist
Text Commands
You can control your hub and nodes by texting commands. Start each command with your hub device code. Commands are not case-sensitive.
Hub Commands
| [CODE] | Changes primary contact number to your phone number |
| [CODE] status | Returns current hub and node status |
| [CODE] add | Adds your number as an extra supervisor contact |
| [CODE] remove | Removes your number from supervisor contacts |
| [CODE] call | Toggle phone call alerts on/off |
| [CODE] text | Toggle text message alerts on/off |
Node Commands
| [CODE]-[NODE] status | Returns status of a specific node (e.g., KWXP2379-01 status) |
| [CODE]-[NODE] on | Start monitoring a specific node (e.g., KWXP2379-01 on) |
| [CODE]-[NODE] off | Stop monitoring a specific node (e.g., KWXP2379-01 off) |
Node IDs are -01, -02, -03, -04, -05
Need Help?
For questions or issues, contact WET Hub support.
What is a Level Monitor?
The WET Level Monitor is a solar-powered level sensor that tracks water or liquid levels in your tank and sends alerts when levels get too low or too high.
- Solar-powered: operates independently in the field
- Wireless reporting: reports level to cloud every 15 minutes
- Low/High alerts: notifies you via text message
Getting Started
- Go to wetstake.com/store
- Choose Level or Weir Tape Monitor
- Submersible Sensor: for deep liquid
- Tape Sensor: for weirs and shallow water
- Choose your service: $25 for plus service (addtional features: multiple users get notifications, gps location, etc.)
- Choose your start and end month (minimum of 6 months) $25 for each additional month
- Deposit will be included in your total of $200
- Click Add to Cart
- Scroll to top of page and Click Proceed to Checkout
- Login with your email or create a new account
- Enter shipping and billing information
- Select shipping option
- Select payment method
- Review the Lease Agreement and Terms of Service and check the box
- Click Pay : you will be redirected to the payment gateway with Stripe
- Once payment is complete, you will receive an email with your order details and we will ship you your WET Level Monitor
WET Level Monitor Hardware
Level Monitor Communication Unit
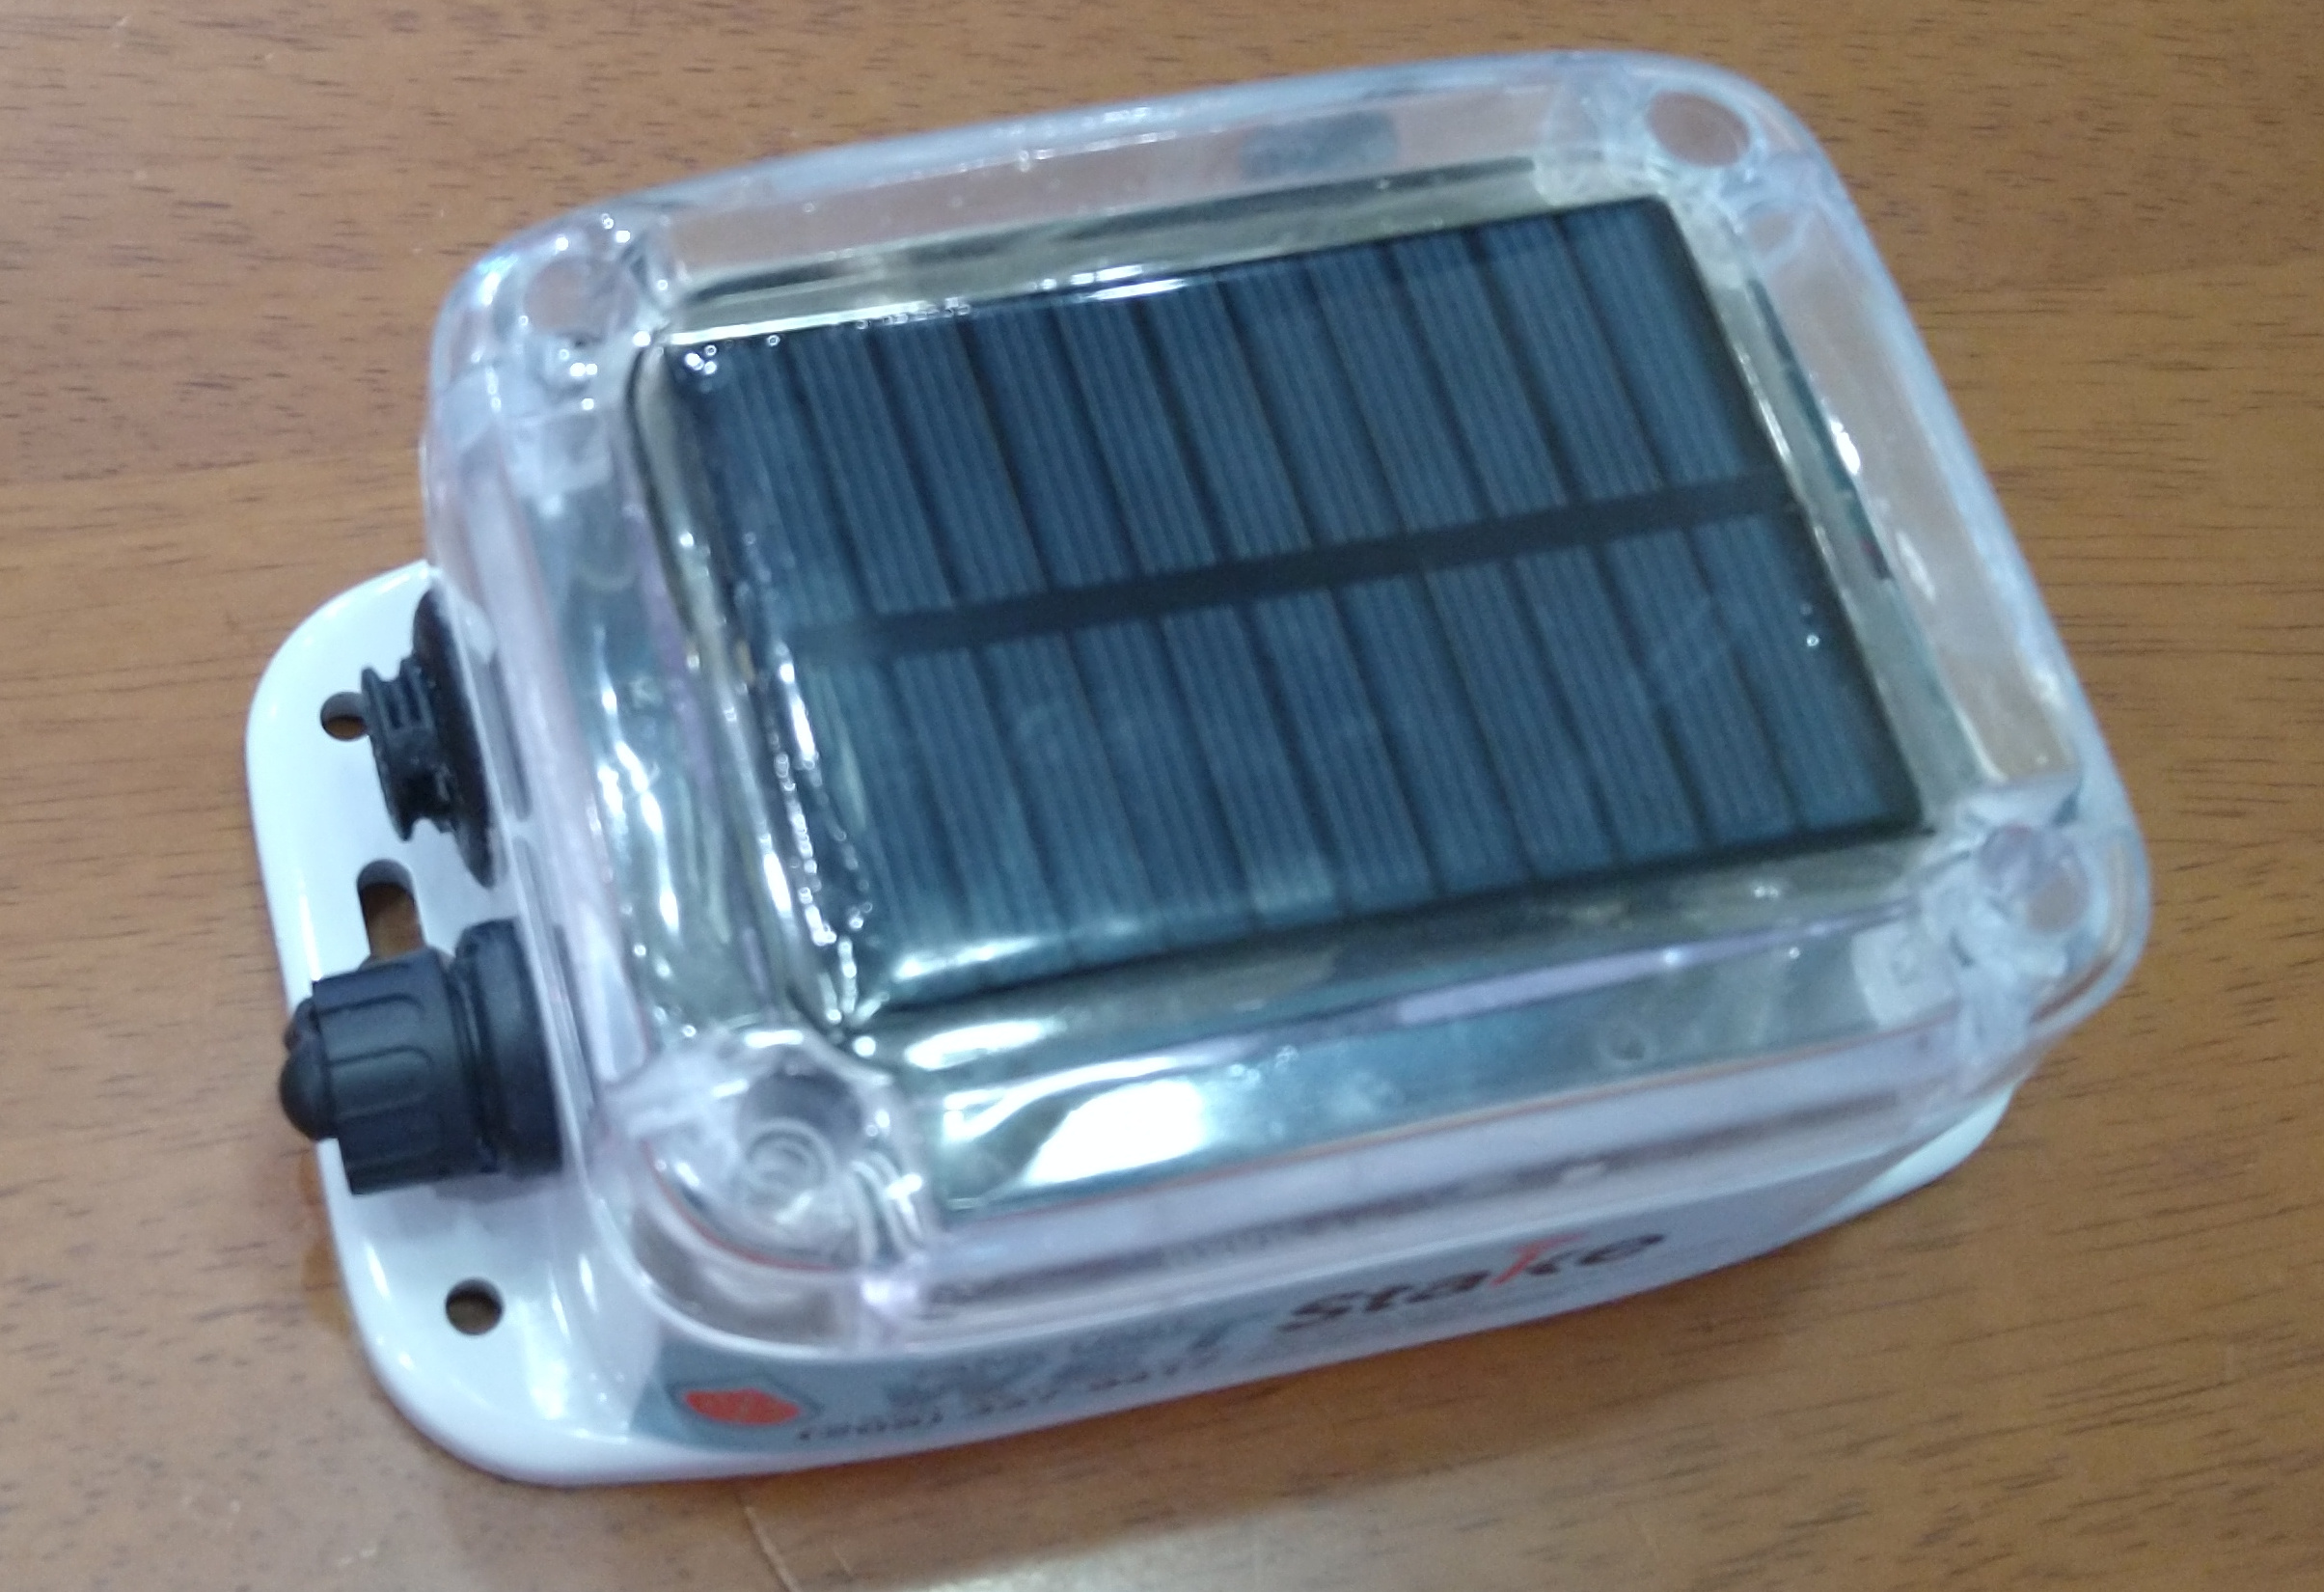
Level Monitor Communication Unit Must be mounted with the solar panel facing up and in direct sunlight. Make sure the lead can reach the liquid you are monitoring.
Two Sensor Options

Silver Submersible Sensor can be submerged in deep liquids
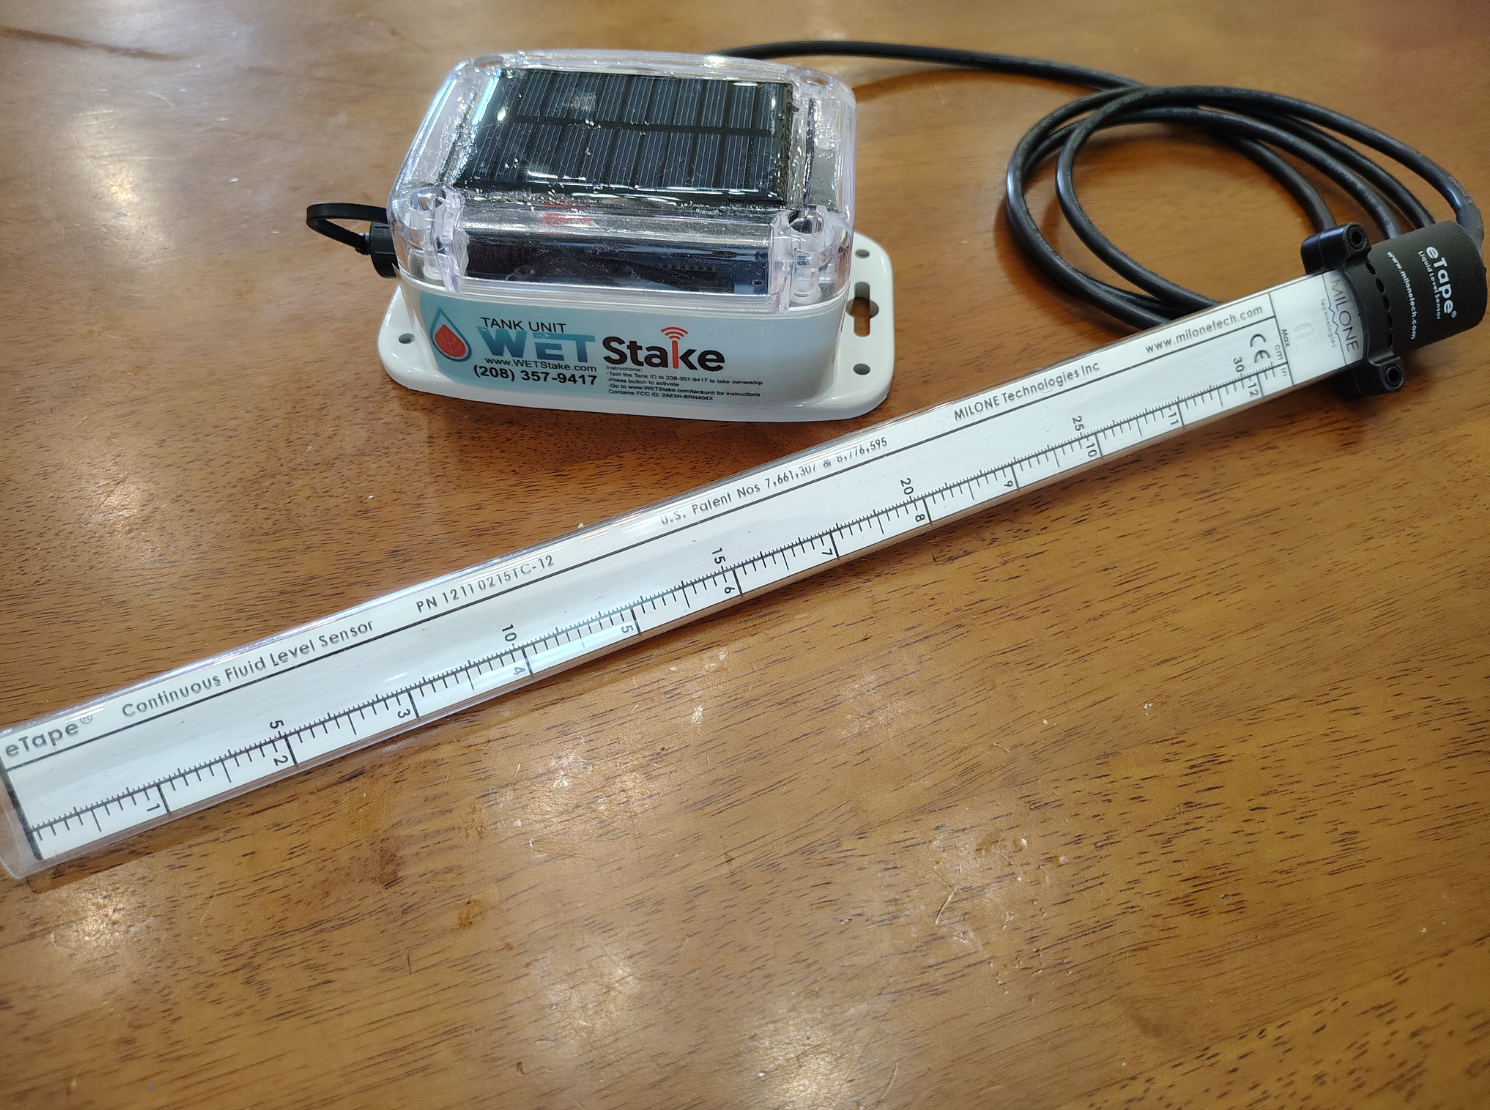
Weir Tape Sensor Measuring tape that measures between 1.5" and 8.25" for shallow water
Receive Your Device
After payment, your Level Monitor will be shipped to you. When it arrives:
- Unbox the Monitor box and sensor
- Mount the Monitor box and place the sensor in desired location
View in Your Dashboard
- Log in to your account
- Go to Devices
- Your Level Monitor should appear your device list
- Click on the device to see detailed settings and readings
Configuring Alerts
Alert Modes
Choose how you want to be alerted:
Low Only
Alert when tank level drops below your threshold (tank is running low)
High Only
Alert when tank level rises above your threshold (tank is overflowing)
Low/High (Both)
Alert if level goes below minimum OR above maximum (tank is outside your operating range)
Set Level
Set a Target and a tolerance. Alert if level moves more than tolerance away from target
Setting Alert Levels
- Click on your Level Monitor device
- Scroll to Alert Settings
- Choose your alert mode
- Set your Levels in inches
- Low Level: Alert when it is below this level
- High Level: Alert when it is above this level
- Target Level: Set a target level
- Tolerance: Alert when it is this far away from target
- Click Save Settings
Notification Contacts
Configure who gets alerts:
- Primary Contact: Your phone number (automatically added)
- Add Extra Contacts (plus service): Add family members, workers, or supervisors
- Text Messages: All alerts are sent via SMS
How It Works
Reporting Cycle
- Every 15 minutes: Your Level Monitor measures the tank level and sends a report
- On your dashboard: You see the current level and when it last reported
- Alerts: You receive a text message immediately if an alert level has been crossed
Battery Status
- Battery level shows on your dashboard (displayed as percentage)
- Green = Good (80%+ battery)
- Yellow = Declining (20-80% battery) — ensure device gets sunlight
- Red = Low (below 20%) — device needs immediate sunlight charging
Troubleshooting
Device not showing updates in dashboard
- Check that the device is powered on
- Verify the device code matches between the physical device and your account
- Devices data will appear after their first automatic report (up to 15 minutes)
Battery draining too fast
- Ensure the solar panel is clean and free of dust/dirt
- Verify the panel faces the sun (oriented south)
- Move away from shadow; even partial shade significantly reduces charging
Not receiving alerts
- Check that your phone number is correct in account settings
- Verify alert thresholds are set (check your settings haven't been reset)
- Confirm the device is actually reporting (check the "last report" time)
- If threshold is near the probe position, small fluctuations might not trigger alerts
Level readings seem wrong
- Check sensor placement; it should be vertical inside if it is the tape sensor
- Verify the probe is actually touching the liquid (not just air)
- If stuck at one value, the probe may be dirty — carefully clean with fresh water
Text Commands
Control your Level Monitor by texting commands. Start each command with your device code. Commands are not case-sensitive.
| Command | What It Does |
|---|---|
| [CODE] | Set your phone number as the primary contact |
| [CODE] status | Get current level, battery, and device status |
| [CODE] add | Add your number to receive alerts |
| [CODE] remove | Remove your number from alert list |
Need Help?
For questions or issues with your Level Monitor, contact WET support.
We accept three payment methods. Pay any way that works for you.
Credit or Debit Card
- Fastest — payment processes immediately
- Includes a small processing fee charged by our card processor (Stripe)
- At checkout, choose Card and enter your card details
Bank Transfer (ACH)
No fees. Takes 3–5 business days to clear.
Here's how to pay by bank transfer:
- At checkout, select ACH (bank transfer) as your payment method.
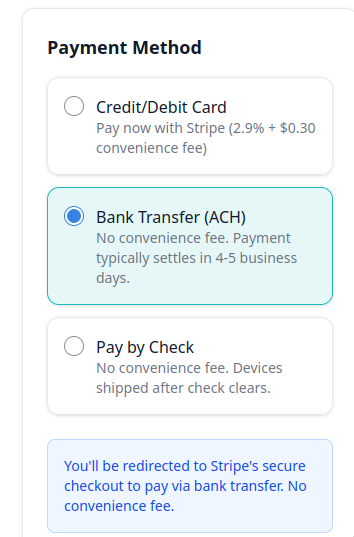
- Stripe will show a list of common banks. If you see yours, click it and log in through Stripe to connect instantly.
- If you don't see your bank in the list, scroll to the bottom — there's an option to enter your routing and account numbers manually.
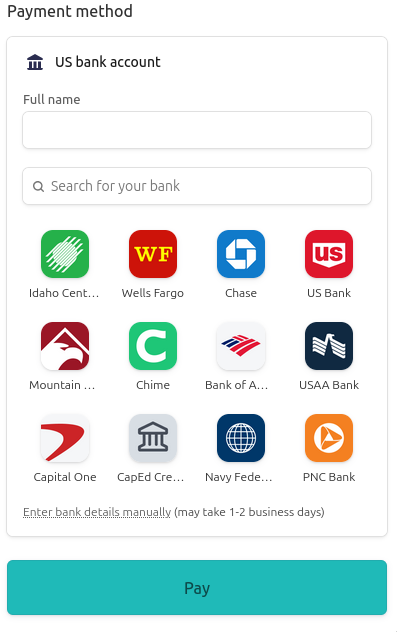
If you go the manual route, Stripe will verify your account by sending two small "micro-deposits" (usually under $1.00 each) to your bank account. Once those land in a day or two, you'll come back and confirm the exact amounts to finish setting up the payment. After that, your invoice payment will process.
Check
No fees. Allow 7–10 days from when you mail it for payment to be recorded.
- Make payable to: WET Stake
-
Mail to:
WET Stake
3448 E 200 N
Rigby, ID 83442 - Please include your invoice number on the check or memo line
Early Pay Discount
Pay your invoice in full by April 10 and receive a $25 flat discount. One discount per customer per year. Applies to all payment methods.
When Are Invoices Due?
- Invoices are sent about one month before your service start date
- Payment is due before service begins
- Need more time? Reply to your invoice email and let us know — we're flexible
Trouble With a Payment?
- Card declined? Check with your bank, then try again.
- ACH micro-deposits not arriving? Allow 2 business days, then call us.
- Anything else? Email customerservice@wetstake.com or call 208-557-1938.